Table of Contents
Here you can configure the logic functions of the RM4200D. To do that, open the branch Logic System in the project tree; there you find further sub branches for configuration. The separate parts are described in this chapter. Please find additional explanations of the functions in the volume System Reference of this manual.
In this chapter (and in the Toolbox4software) the following terms are used, some of them have the same meaning:
Logic 1, true, 1, active.
Logic 0, false, 0, not active.
Rising Edge, signal change from 0 to 1.
Falling Edge, signal change from 1 to 0.
You find all Logic Sources of the RM4200D in the Logic Sources Window. If you define new logic functions, these are also displayed in this window, below the node Logic Functions. You can use these functions in the same way as you do with the ones preset by the system.
To open the Logic Sources Window use the command from the menu or press the key F5.
You can use all logic functions from the Logic Sources Window as input values for the functions described in this section.
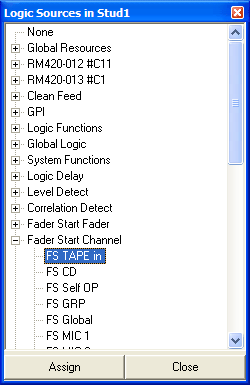
The following table provides an overview of the different function groups of Logic Sources and their sub entries. You also find detailed descriptions under the functions controlling the different logic sources.
| Name of the Function Group | Entries | Description | ||||
|---|---|---|---|---|---|---|
| None |
| |||||
| OFF |
| |||||
| Global Resource | <Name of he Global Resource>.<Name of the subscriber> |
| ||||
| RM420-0xx #<ID1…ID12> | KEY <1..n> <keylabel> |
| ||||
| Clean Feed |
| |||||
| CF Prep. <inputname> |
| |||||
| CF Talk <inputname> |
| |||||
| CF Off Air <inputname> |
| |||||
| CF Output Select <inputname> |
| |||||
| GPI | GPI <slot>.<plug.>01 <label> |
| ||||
| Logic Functions | LF <name> |
| ||||
| Global Logic | GL1…200 <name> |
| ||||
| System Functions |
| |||||
| PFL On |
| |||||
| ...System Functions | Pulse 1 |
| ||||
| Pulse 2 |
| |||||
| Pulse 3 |
| |||||
| Off Air |
| |||||
| Voice |
| |||||
| PGM1 |
| |||||
| Solo |
| |||||
| Timer Running |
| |||||
| Timer Reset |
| |||||
| Slot 10,20,30 MADI 1,2 Error |
| |||||
| Logic Delay | LD <name> |
| ||||
| Level Detect | LV <name> |
| ||||
| Correlation Detect | LC <Name> |
| ||||
| Fader Start Fader | FS Fader 1…n |
| ||||
| Faderstart Channel | FS <FaderChanName> |
| ||||
| PFL Fader | PFL Fader 1…n |
| ||||
| PFL Channel | PFL <FaderChanName> |
| ||||
| Fader Function Fader | FF Fader 1…n |
| ||||
| Fader Function Channel | FF <FaderChanName> |
| ||||
| Fader Function 2 Channel | FF2 <FaderChanName> |
| ||||
| Rotary Select | RS <SourceListName> Text |
| ||||
With RM4200D, you can create up to 150 different logic functions that can use up to 20 Logic Sources. For each logic function, you can link the Logic Sources either by OR or AND. The list of logic functions illustrates the way each function is linked. If the symbol “&” is displayed in the column Conc., the function is AND linked. If the symbol is missing, the function is OR linked. To create more complex Boolean functions, you can use already defined logic functions again as Logic Sources for further logic functions.

Flip-Flop-like functions can be set up using Interlock Logic Buses. This is a special function that allows all logic functions on the same Interlock Logic Bus to deactivate each other as soon as one of the logic functions becomes active. This way, you can e.g. create alternating key set functions, of which only one logic function is active at the same time. Many other applications are possible. You can use up to 100 different Interlock Logic Buses. If a logic function uses an Interlock Logic Bus, its number is displayed in the list of Logic functions in the IL Bus column. (see also Interlock Logic Bus)
The logic functions are processed every 20 ms in the Communication&Logic Controller RM420-850 and supplied via CAN bus to all other controllers. The order of the processing corresponds to the order in the list (top to bottom) in which the logic functions are contained in the configuration dialog. (see figure 67: Logic Functions, configuration dialog.)
To insert a new logic function into the list Logic Functions, use the button . To delete an entry from the list, select it and click on the button . You can choose both functions from the contextual menu inside the list.
After marking the desired function in the list Logic Functions, you can configure it in the right pane of the dialog under Edit Logic Function. The following list describes a configuration example for a new logic function:
First enter a descriptive name for the function in the field Label; this may be up to 10 characters long. Please consider that for a maximum of 150 logic functions per Device, this name is important for the clarity of your configuration! The name is displayed in the Logic Sources Window after the short name “LF”.
Now click on the button , to open or activate the Logic Sources Window. Select the desired Logic Source.
Before assigning the selected Logic Source, first decide how it shall influence the logic function. This feature is displayed in the logic function as icon for each Logic Source. You can define the following features:
ON 
Logic Source works directly.
OFF 
Logic Source is inverted.
Pulse on activate 
Rising edge activates the function.
![[Note]](../pics/note.gif)
Note Use only in connection with Interlock Logic Bus!
Example: Key is pressed.
Pulse on deactivate 
Falling edge activates the function.
Note Use only in connection with Interlock Logic Bus
Example: Key is released.
![[Important]](../pics/important.gif)
Important The options Pulse on activate and Pulse on deactivate may only be used in logic functions with activated Interlock Logic Bus!
Now assign the desired Logic Source. Either use the button or double click the desired source. Alternatively, you can also move a Logic Source into the list using Drag&Drop. If a Logic Source is already marked in the list, it is overwritten. The same happens if you move a Logic Source into an already existing row of the list.
Choose whether the logic functions are to be linked AND or OR and whether they are to be interconnected with an Interlock Logic Bus. (Find more details on that in the following sections.)
For the AND logic, all Logic Sources must be true for the logic function to be true as well. AND linked logic functions are marked with a “&” in the Conc. column (Concatenation).
In the following example, the Logic Source System Functions/Solo is linked to the Logic Source System Functions/Pulse1 using an AND logic. You can put the created logic function SOLOBLINK on the LED of a User Defined key of the control. This starts flashing when at least one Solo key is pressed in any Fader Module.
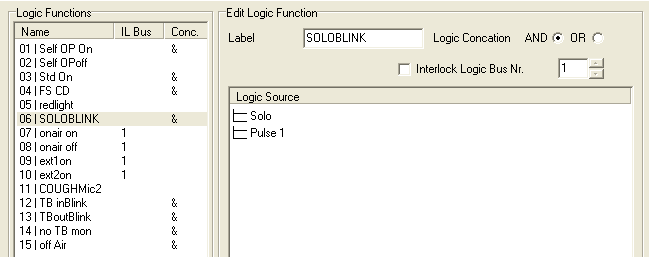
You can use the logic source System Functions/Solo to switch loudspeakers between the monitor bus and the solo bus using an Output Function. The flashing key indicates that the loudspeaker is not switched on to the monitor bus.
For the OR logic, at least one Logic Source must be true in order for the logic function to be true.
In the following example, the Logic Sources Fader Start/Mic1...4 are linked with each other by OR.
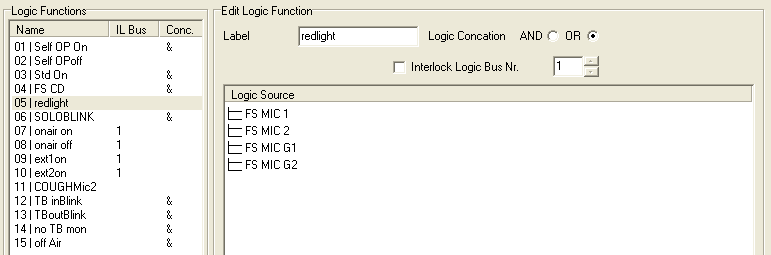
To activate a logic function it is sufficient to open the fader of at least one of the microphone channels. This might be a solution to e.g. switch on the red light over a GPO.
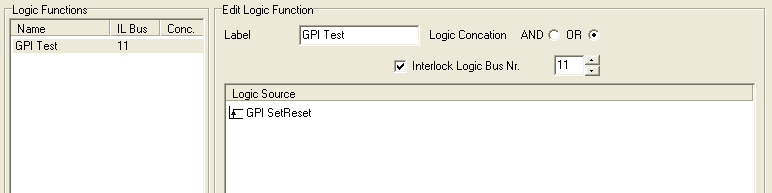
This function is used to interlink several alternating logic functions. All logic functions influencing each others must be switched on to the same Interlock Logic Bus.
You can use up to 100 different Interlock Logic Buses at the same time, although in this case a logic function can be linked to only one Interlock Logic Bus. But it is possible to use several of these logic functions as inputs for further logic functions again that themselves use other Interlock Logic Buses.
The function of an Interlock Logic Bus can be described as follows:
If a logic function is linked to an Interlock Logic Bus, at first it reacts normally. It becomes active if its logical conditions become true.
If a logic function using an Interlock Logic Bus becomes true, all other logic functions linked to the same Interlock Logic Bus No. become inactive. Thus, activating one logic function on the same Interlock Logic Bus causes the deactivation of all other logic functions.
Since the logic functions in the RM4200D are processed successively, a state change of a logic function with activated Interlock Logic Bus can only be triggered reasonably by a rising or falling edge of the triggering Logic Source to be controlled. If you use an already defined logic function as Logic Source, you can also output this result as edge. To achieve that, select the function in the Logic Sources Window and then click on the option Pulse on activate or Pulse on Deactivate. (see also Example 4 - Changing state with two keys)
| Note |
|---|---|
The display of the Interlock Logic Bus No. under Edit Logic Function does not matter when the checkbox Interlock Logic Bus is not activated. | |
The following examples illustrate the use of Interlock Logic Bus to solve real practical problems.
A logic function is set by the rising edge of a GPI, reset by the next rising edge, etc.
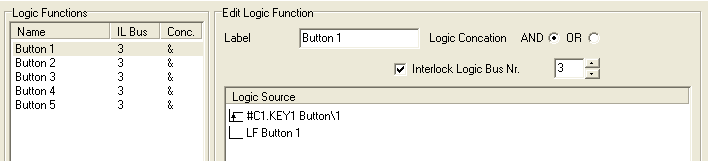
An alternating key set with several keys is created by defining a logic function for each key. All these functions are interconnected with the same Interlock Logic Bus. Each of the logic functions has only the corresponding own key as Logic Source (with the feature “Pulse on activate”).

When you press a key, its logic function becomes active, the previously active key becomes inactive. When pressing the active key again, it is switched off.
The logic functions control the LEDs of the corresponding keys with the function User Defined.
This example is similar to the key set from example 2, with one difference: When pressing the currently active key, it is not switched off. Only after resetting the system, all logic functions are inactive.
Each logic function has an own key as Logic Source (Pulse on activate) AND additionally, the own inverted logic function. This way, the function can only be activated when it is inactive.
The logic functions control the LEDs of the corresponding keys with the function User Defined.
The following complex example consists of four logic functions. It demonstrates how you can program a key set consisting of two alternating keys. The keys act as follows:
There are only the two states “Key 1 pressed (state A)” and “Key 2 pressed (state B)”; there is no state in which both A and B are inactive.
If an active key is pressed again, the state does not change.
The logic function Aaktiv is put on the LED of the User Defined key A and the logic function Baktiv on the LED of the User Defined Key B . These two logic functions can e.g. switch audio signals using Output Functions.
This arrangement needs an Interlock Logic Bus in one logic functions, e.g. the bus No. 2 in the logic function Baktiv. The three other logic functions do not use an Interlock Logic Bus.
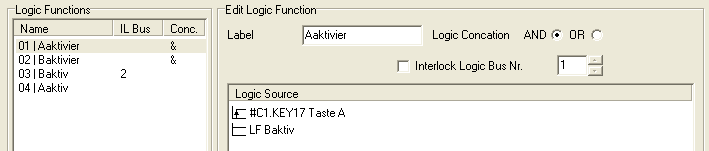
The logic function Aaktivier becomes active if condition B is active and key A is pressed.
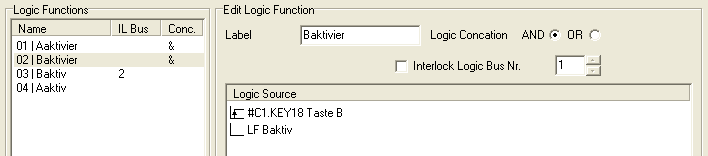
Baktivier becomes active when condition B is inactive (A is active) and the key B is pressed.
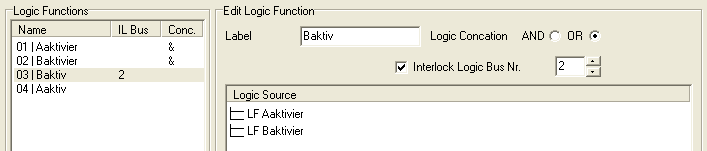
Baktiv is assigned to Interlock Logic Bus 2 and can change its state triggered by Aaktivier or Baktivier. Which of the two OR linked Logic Sources sets or resets the function, is determined by the logic functions Aaktivier or Baktivier. In turn, their output is determined by the conditions B and A (= inverted condition B) linked by AND.
Baktiv furthermore controls the LED source of key B and the corresponding function to be executed respectively.
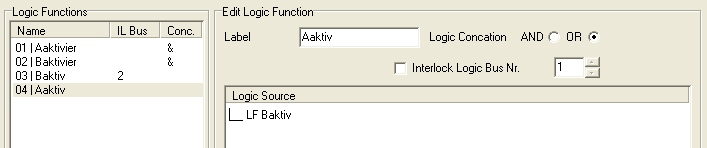
Aaktiv is the inversion of the condition Baktiv.
Aaktiv furthermore controls the LED source of key A or the corresponding function to be executed respectively.