Table of Contents
You find the project tree in the left part of the Toolbox4 software. One or more Devices are displayed as nodes with their respective names. If you open the node of a particular Device, you can reach different parts of its configuration. (see figure 1: Toolbox4 Project Options.)
You can navigate in the project tree by pressing the right mouse button, some functions you can also access by right-clicking for the contextual menu. You can also use the arrow keys on the keyboard for navigation and the buttons in the software for executing the functions.
If you marked the project itself – the top entry in the project tree – you can add a new Device to the project tree, either with the contextual menu or with the button .
If a Device is marked, you can remove it either using the contextual menu or with the button . In the contextual menu, there is the command which you can use to copy a Device completely.
If you mark the topmost entry in the project tree, several tabs are displayed on the right side of the Toolbox4 window.
A project is unambiguously identified by the data in the fields Project name and Project ID. The project name is displayed as topmost entry in the project tree, it has no further function. In contrast, the project ID is transferred to the Devices and important for the communication using the UDP protocol. If several Devices in a network are to exchange Global Functions, they must have the same Project ID.
![[Important]](../pics/important.gif) | Important |
|---|---|
If several RM4200D projects are operated in the same network, they all must have different Project IDs! | |
A project ID consists of 4 ASCII characters forming together a 32 bit address for unambiguous identification. If you create a new project, the project ID is generated anew by a random number generator, but you can edit it afterwards.
The project ID is displayed in the Maintenance Window in front of the corresponding Device name as well as in the window for loading a configuration to or from a Device.
You can see in the pane Information who has modified the project at which point — in the fields Last edit by and Date. For the name of the editor, the software enters the current Windows user name. The field Project version is for information only, a further function is not implemented yet.
In order to make the configuration of interconnected Devices in a project easier, you can link them to each other using Device Links. Then, the labels for the audio channels need only to be entered at one of the Devices – at the output. The corresponding inputs of the other Device receive the same labels automatically. (see DSP Frame I/O — Configuring the DSP Frame) If the audio modules are interconnected by Device Links, changed labels for the inputs are ignored. Furthermore, the features Mono/Stereo and Headroom are connected, too.
To be able to use Device Links, at least two Devices must be configured in the project.
![[Note]](../pics/note.gif) | Note |
|---|---|
The configuration of Device Links is only meant to make work easier. Apart from the common editing of labels and features, they have no other functions. | |
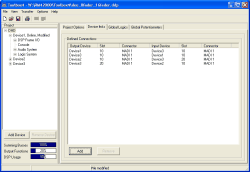
Device Links can be set up for all audio signals available in the RM4200D; MADI, Digital AES3/EBU and analog, too. A Device Link is a connection between a source and a destination, both being defined with the number of a certain connector in a certain slot of the DSP Frames. This is especially helpful with MADI connections between Devices. There are mostly used bi-directional as shown in Figure 23: Example setup for two bidirectional MADI Device Links. :
Follow these steps for setting up a Device Link:
Make sure the desired modules are kept in the configuration and are configured with the appropriate features. (see DSP Frame I/O — Configuring the DSP Frame)
Select the topmost node in the project tree – the project itself. Now choose the tab Device link on the right side of the window.
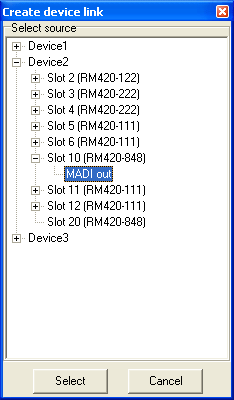
Create a new Device using either the command from the contextual menu or click the button . In the window appearing, you see the slots and signals available in the project. (see figure 24: Creating a Device Link, window for selecting the source.)
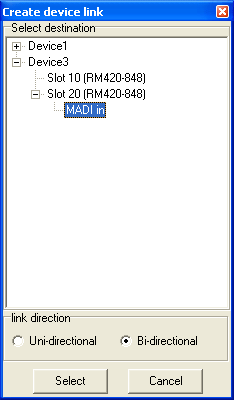
Select the desired signal source by either double clicking or by highlighting it and then pressing the button . The windows with the signal sources closes, in the next window you see the available destinations for the Device Link. (see figure 25: Creating a Device Link, window for selecting the destination.)
Now select the destination of the connection in the same way as you did for the source. For MADI connections, you can also choose the option Bi-directional to automatically set up the two paired Device Links. (see figure 26: Configuration of two bidirectional Device Links between MADI ports.)
The connection is set up and displayed in the area Defined links in the main window. You see an error message if problems with assignment are occurring.
If several Devices are coupled with Ethernet, they can exchange Global Logic functions using UDP commands.
These Devices are managed in a project. This makes configuration easier and ensures a correct assignment of the participating Devices. This way, all Devices receive the same project ID.
![[Important]](../pics/important.gif) | Important |
|---|---|
The project IDs must be identical in order to make Devices able to exchange Global Logics via UDP. | |
In a project, you can use up to 200 Global Logic functions, each of which can be feed with any one Logic source of the Devices available in the project. All Global Logic functions again are available as Logic sources in each Device of the project.
![[Note]](../pics/note.gif) | Note |
|---|---|
If the RM4200D Devices are coupled over a serial RS232 port, only the Global Logics 1 to 50 can be exchanged. This communication is compatible with the preceding product RM3200D. | |
To assign a Global Logic function, use the following steps:
Mark the topmost node in the project tree – the project itself. Then select the tab Global Logics on the right side of the window.
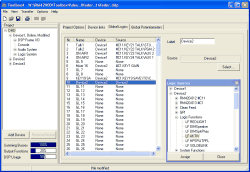
You see a list of all 200 Global Logic functions. Select the desired function and the click on the button . Alternatively, you can also double click on the function. Either way, you open the Logic Sources Window. (see figure 27: Configuration of Global Logic functions.)
Select the Logic sources available in the project by clicking on them. Now click on the button or double click the selected Logic source. The result is displayed in the line with the selected Global Logic functions in the column Source.
If necessary, you can now name the Global Logic functions appropriately in the field Label.
If several Devices are coupled with Ethernet, they can exchange Global Potentiometers using UDP commands.
These Devices are managed within a project. This makes configuration easier and ensures a correct assignment of the participating Devices. This way, all receive the same project ID.
![[Important]](../pics/important.gif) | Important |
|---|---|
In order to enable Devices to exchange Global Potentiometer values over UDP, their project IDs must be identical. | |
You can use up to 20 Global Potentiometers in a project. Each of them can be coupled with one fader or can be set using scripts. All Global Potentiometers can be used in each Device of the project to influence levels in Output Functions. (see Output Functions)
A Global Potentiometer is controlled by the corresponding fader. You can define this assignment for the appropriate Device in the submenu Audio System/Channel Assignment. (see Channel Assignment – Assigning Fader Channels and DSP Processing)
If you have marked the topmost node in the project tree, you can name the Global Potentiometers accordingly in the tab Global Potentiometers.
![[Note]](../pics/note.gif) | Note |
|---|---|
Global Potentiometers are not supported by the serial port of RM4200D. | |
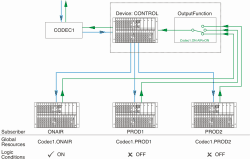
Global Resources are to a certain extend related to Global Logic Functions. They have been developed in order to assign uniquely available audio sources in a studio complex of several RM4200D exclusively to certain users. A typical scenario for this is e.g. a central phone line, the back line of which is feed from two or more studios as selected. But the line can be used by only one studio at the same time! The following figure illustrates such a situation. There, the Device “Control” is the Master, in which the Global Resource is coordinated. All other Devices are Subscribers that access the resource alternately and exclusively.
Global Resources offer the functions necessary to allow the “exclusive ownership” of a resource and the “change of the owner” on request. The functions are based on the following design principles:
A Global Resource is offered or “published” by exactly one Master. One or more Subscribers are defined and can own the resource. You can define up to 20 Global Resources.
A resource can either be vacant (not owned by any subscriber) or owned by exactly one subscriber. You can determine which state the Global resource should have after switching on the RM4200D or after a reset. It can either be vacant or assigned to a certain subscriber.
Master and subscriber are different Devices in the same project. Nevertheless, it is possible to define master and subscriber on the same Device.
The master is defined only to determine the Device responsible for the Global Resources management. Apart from that, it has no special function.
Global Resources are implemented as special logic signals. There is exactly one logic signal for each subscriber of a resource that can be accessed by all Devices in the project. This logic signal is active if the corresponding subscriber owns the resource. At the same time, the logic signals of all other subscribers are inactive. In the Logic Sources Window in the pane Global Resources, you have access to these signals.
Switching between the different subscribers is done using special key functions. These have to be assigned to keys on the Console. Please find more details on that later in the book.
Global Resources switch the logic signals only. The audio signal itself is modified using Output Functions or Super Output Functions as usual, controlled by the logic signals of the Global Resources.
You can define up to 20 Global Resources that are used by all Devices in the same project. For this, the Devices must be coupled via Ethernet, thus being able to exchange messages using UDP!
![[Important]](../pics/important.gif) | Important |
|---|---|
Make sure that all Devices have the same project ID! If not, no messages can be exchanged using UDP, so the Global Resources do not work. | |
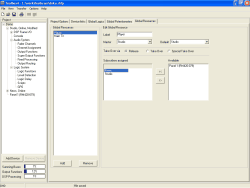
In order to define Global Resources, first you have to highlight the uppermost node in the project tree – the project itself - with a mouse click. After that, click on the tab Global Resources to open the configuration dialog.
To define a Global Resource, use the following steps:
Click on the button to create a new resource. Type a descriptive name in the entry box Label.
Select the Device to manage the Global Resources from the popup menu Master. It is not necessary to define a subscriber on this Device as well, but you can do it if it seems useful to you.
![[Note]](../pics/note.gif)
Note Any Device can be defined as Master. It is useful, though, to select the Device which the resource (e.g. the phone line) is really connected to. This way, you make sure that the line is available if the “Master” Device is active.
Now determine the Devices that may access the Global Resource as subscribers. To do that, use the two lists in the bottom area of the dialog. To define a Device as subscriber, highlight a Device in the pane Available and then click on the button to move it to the list Subscribers assigned on the left. To delete a Device from the subscribers list, highlight it and then click on the button .
In the Default popup menu, define which subscriber owns the Global Resource by default. This is relevant when switching on the Master Device or when triggering a reset. The “Default Subscriber” is also assigned when a subscriber itself releases the Global Resource without a request from a different subscriber.
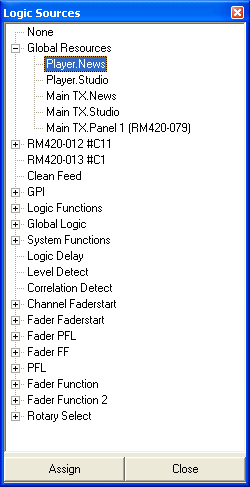
The Global Resource just created is available immediately as a logic function to all Devices in the project. You will find it in the Logic Sources Window under the node Global Ressources. Is is named <Name of the Global Resource>.<Name of the Subscriber>. There is exactly one logic function for every subscriber assigned. This is always active when the subscriber owns the Global Resource.
You can access Global Resources only of you have defined the appropriate keys for a resource request on the Console.
![[Important]](../pics/important.gif) | Important |
|---|---|
You have to define a designated key on the Control Module for each Global Resource that you want to access. In addition, there must be keys with the system functions OK and Cancel defined on the same Console. | |
To define a key for a Global Resource request, use the following steps:
Select the node Console in the project tree. Click on the tab Keys and select a Control Module (RM420-010, RM420-012, RM420-013, RM420-014…).
In the module view, click on the key you want to use to request the Global Resource. Select the function Resource Request from the popup menu Function. Two further popup menus appear below.
In order to select the Global Resource to request the key, use the Resource popup menu. Then, select the Device which the Global Resource will be requested for from the popup menu Reserve for. Each Device can request the Global Resource for itself (entry Self (default)) or for other resource subscribers.
![[Tip]](../pics/tip.gif)
Tip For example, it may be useful to request the Global Resource for a different subscriber, if the corresponding key is in the control room from which the lines or phone codecs are assigned to various studios. Assigning the resource to a different Device makes also sense of you are using the control panels with LCD keys.
Finally, define the key colors. The ON color is displayed when the Device owns the Global Resource. The OFF color is displayed when the resource is vacant. If the resource is taken by a different subscriber, the key is off.
If a Global Resource is taken by one Device, other authorised subscribers can request the resource. To request or take over resources or to confirm or deny requests, for each Device, the system functions “OK” and “Cancel” must be configured as key functions in a Control Module (RM420-010, RM420-012, RM420-013, RM420 …).
There are three procedures to take over a Global resource:
Release. The resource is taken by a Device which is the “Owner”. Another Device requests the resource. The owner can deny or confirm this request. If he confirms it, it releases he resource. The procedure requires that the appropriate keys are pressed on the Consoles of both Devices.
Take Over: The resource is taken. The request is issued by a different Device. In a second step, the requesting Device confirms the request itself and takes over the resource. Alternatively, the owner can release the resource or deny the request, too.
Special Take Over: The resource is taken by the owner. It is requested by a different Device. If there is no confirmation from the owner, the requester can enforce the take over. For this, the request key together with the OK key must be pressed for 5 seconds. Alternatively, the owner can release the resource or deny the request, too.
A resource is always handed over in two steps – a request and a confirmation. During this procedure, the colors of the keys involved and the LE displays supply information on the current status of the procedure. It works like this:
One Device requests the resource (Request). Therefore, the request key and the OK key must be pressed simultaneously on the Console of the requesting Device.
In the second step, the resource is released by the owner (Release) or taken over by the requesting Device (Take Over, Special Take Over).
![[Tip]](../pics/tip.gif) | Tip |
|---|---|
The best way to understand these procedures is to create a Global Resource for a test and then try out the take over using two Consoles. | |
The following examples illustrate the different steps and status displays during the assignment of a return line.
![[Important]](../pics/important.gif) | Important |
|---|---|
Due to construction constraints, the display options of the LC displays in the Control Modules RM420-010, RM420-012, RM420-013 and RM420-014 and the LCD keys in the modules RM420-027, RM420-078 and RM420-079 are limited to six digits. To avoid ambiguities, you should assign six-digit Device and resource names only. | |
The following configuration settings are used for the examples:
| Resource Name | CODEC | ||
| Default Owner | No Device | ||
| Take Over Mode | Release | ||
| Subscriber Name | Stud1 | Stud2 | LCD (RM420-079) |
| Reserve for | Self (default) | Self (default) | Studio 1 |
| Key color ON | Red | Red | - |
| Key color OFF | Yellow | Yellow | - |
| Key color “Available” | - | - | - |
| Key color “Owned” | - | - | - |
| Key color “Busy” | - | - | - |
Situation 1: The resource is vacant and taken over by Stud1.
| Stud1 | Stud2 | LCD | |
| Status display | key CODEC = yellow | key CODEC = yellow | key CODEC = green line 1 displays “CODEC” |
| Request to Resource | Keys CODEC + OK pressed | - | |
| State display | key CODEC flashes yellow | key CODEC = off | key CODEC flashes green, line 3 displays Rq Device “Stud1” |
| Check resource state | key CODEC pressed | key CODEC pressed | - |
| State display | Display (Rq = Request): “CODEC Rq Stud1” | Display (Rq = Request): “CODEC Rq Stud1” | - |
| Resource take over | keys CODEC + OK pressed | - | - |
| State display | key CODEC = red | key CODEC = off | key CODEC = red line 2 displays Ow Device “Stud1” |
| Check resource state | key CODEC pressed | key CODEC pressed | |
| State display | Display (Ow = Owner): “CODEC Ow Stud1” | Display (Ow = Owner): “CODEC Ow Stud1” |
Situation 2: The resource is taken by Stud1 and released by Stud1.
| Stud1 | Stud2 | LCD | |
| State display | key CODEC = red | key CODEC = off | key CODEC = red line 2 displays Ow Device “Stud1” |
| Check resource state | key CODEC pressed | key CODEC pressed | - |
| State display | Display (Ow = Owner): “CODEC Ow Stud1” | Display (Ow = Owner): “CODEC Ow Stud1” | - |
| Initiate release | keys CODEC + OK pressed | - | - |
| State display | key CODEC = flashes red | key CODEC = off | key CODEC = red line 3 displays “off” |
| Check resource state | key CODEC pressed | key CODEC pressed | - |
| State display | Display (Rq = Request): “CODEC Rq Off” | Display (Rq = Request): “CODEC Rq Off” | - |
| Execute release | keys CODEC + OK pressed | - | - |
| State display | key CODEC = yellow | key CODEC = yellow | key CODEC = green |
Situation 3: The resource Stud1 is taken and requested by Stud2.
| Stud1 | Stud2 | LCD | |
| State display | key CODEC = red | key CODEC = off | key CODEC = red line 1 displays “CODEC” line 2 displays Ow Device “Stud1” |
| Check resource state | key CODEC pressed | key CODEC pressed | - |
| State display | Display (Ow = Owner): “CODEC Ow Stud1” | Display (Ow = Owner): “CODEC Ow Stud1” | - |
| Request to resource | - | keys CODEC + OK pressed | - |
| State display | key CODEC flashes red | key CODEC flashes yellow | key CODEC flashes red, line 3 displays Rq Device “Stud2” |
| Check resource state | key CODEC pressed | key CODEC pressed | - |
| State display | Display (Rq = Request): “CODEC Rq Stud2” | Display (Ow = Owner): “CODEC Ow Stud1” | - |
| Resource hand over | keys CODEC + OKpressed | - | - |
| State display | key CODEC = off | key CODEC = red | key CODEC = yellow line 2 displays Ow Device “Stud2” |
| Check resource state | key CODEC pressed | key CODEC pressed | - |
| State display | Display (Ow = Owner): “CODEC Ow Stud2” | Display (Ow = Owner): “CODEC Ow Stud2” | - |
Finally, you have to connect the logic states of the resource with audio signals using an Output Function. (see Output Functions)
The best option is to create the Output Function within the Device where the signal CODEC1 is physically available. This signal must also be provided to the second Device, e.g. via MADI. The second Device transmits the return signal CODEC2 to the first Device that is connected to CODEC1.
Thus, the Output Function connected to the physical output going to CODEC1 looks like this:
| Condition | Source 1 | Level 1 | Source 2 | Level 2 |
|---|---|---|---|---|
| Default | CF CODEC1 (local) | Off | CF CODEC2 (MADI) | Off |
| CODEC1.Stud1 | CF CODEC1 (local) | 0 dB | CF CODEC2 (MADI) | Off |
| CODEC1.Stud2 | CF CODEC1 (local) | Off | CF CODEC2 (MADI) | 0 dB |
If necessary, Global Resources can be requested and released also using keys on Fader Modules. To do this, you have to define the keys for the Console and the assigned resource in a Fader Channel. If the Fader Channel is switched to a fader, you can use the request key as follows:
Press the defined key in the Fader Channel to request the resource. The key starts flashing. The current owner of the resource can now confirm the request. If you press the key again before receiving a confirmation, the request in interrupted.
As soon as the resource is taken over by your Device, the key lights up accordingly.
If you press the key again, the resource is released immediately and without a second confirmation.
![[Tip]](../pics/tip.gif)
Tip This mode of operation is useful e.g. if the resources are managed by an engineer or an assistant in the control room and if you want to switch on external lines or phone codecs to a fader quickly, just pressing one key.
To define a key on a Fader Module to request Global Resources, use the following steps:
Make sure the Global Resources are defined correctly. (see also Defining Global Resources)
Select to the node Console in the project tree and click on the tab Keys. Select a Fader Module and click on the key you want to use to request a Global Resource.
Select the entry Resource from the Function popup menu. Define the key colors for the states On and Off.
In the project tree, switch to the node Fader Channels (under Audio System). Select a Fader Channel from the list Defined Channels. This is the channel you want to configure the request key on the Fader Module for.
To assign the Global Resource to the selected Fader Channel, use the Global Resource popup menu in the pane General. Load the Config to the DSP frame.
As soon as the configured Fader Channel is switched on a fader, you can request the Global Resource using the defined key as described above.

