You find the menu in the project tree as further sub branch below the branch Audio System.
Output Functions are universally usable DSP functions for switching, level control, talkback and summation applications. Often, these are used immediately before the audio signal leaves the system, therefore they are called Output Functions.
Each Output Function has two audio inputs Source 1 and Source 2, that are summed up via two corresponding amplification factors Level 1 and Level 2. The special thing about this is the following: Both the sources of input signals as well as their level values can change according to logic conditions (Conditions). The Output Signal of an Output Function itself is also available as an audio source on the TDM bus. This concept allows to implement many different applications in a very flexible way.
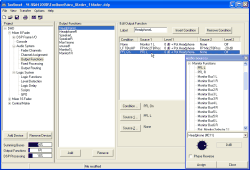
In the following figure, you see an example for a configured Output Function in the pane Edit Output Function:
The following signals can be used as input signals (Source 1 and 2) for Output Functions:
Audio channels available on the internal TDM bus: Inputs, Mixing (sums, groups, AUX buses), Pre Fader (Fader Channels after Input Processing), Clean Feeds, Monitor Functions (only PFL), Fixed Processing, Output Functions.
Internal “virtual” audio sources: Monitor Functions (Monitor Buses 1 - 6, Rotary Monitor Selector 1 - 10), Routing (Number 1 to 768).
You can set the level values (Level 1 and 2) from -oo (off), -100dB to +20dB in steps of 1dB. Furthermore, you can add the value of the potentiometer to this fixed amplification factor. The phase of the signal can be shifted by 180˚.
In total, apart from the preset logic condition None, an Output Function can have up to 9 further logic conditions. Each of them is displayed as a row in the list to the right and can have assigned different input signals and level values.
The logic condition None always stands in the uppermost row and is always active when none of the configured conditions below are active.
As logic conditions in the column Condition, you can use all logic sources available in the Logic Sources Window.
The priority of logic conditions decreases from top to bottom, so a condition is only considered if all conditions above it are inactive.
This means for the example in the figure (viewed from bottom to top):
If the Logic Source PFL On is active (at least one PFL key pressed), the third row is carried out – the PFL bus is routed to the output of the Output Function.
If the PFL On and the logic condition LF TBtoHP (logic function Talk Back to head phone) are both active at the same time, the second row is carried out – the audio source FP Mic2TBProc (Talk Back microphone) is routed via Source 1 to the output of the Output Function. Using Source 2 a minimum level of the source FP Mic2TBProc of -20dB is mixed in, Talk Back is therefore audible even at closed potentiometer.
If neither PFL On nor the condition LF TBtoHP is active, the first row is carried out – Monitor 1 (monitor selector) is routed to the output of the Output Function.
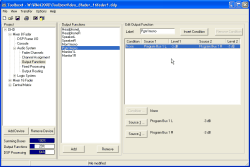
If no further logic condition is configured, the first line None is always active. This variation is often used for mono summation as illustrated in the following figure:
Output Functions are mono on the input and the output sides, that is why for stereo signals they must be programmed separately for the left and the right channels!
To setup a new Output Function, click on the button ; to delete it, click on respectively. Both functions can be used over the contextual menu of the list Output Functions.
![[Note]](../pics/note.gif) | Note |
|---|---|
In order to use Output Functions as inputs for stereo Fader Channels or for stereo Fixed Processing, there must be an even number of Output Functions before the Output Function in the left channel. For stereo Output Functions used in pairs, the right channel must follow the corresponding left channel. | |
![[Warning]](../pics/warning.gif) | Warning |
|---|---|
You should never delete Output Functions when changing a configuration. Otherwise the assignment of the following Output Function pairs is disturbed when they are used as stereo inputs for Fader Channels or Fixed Processing! Instead, rename the unused Output Functions, e.g. “unused1” or “rem”. Output functions marked unused this way can be reused later. | |
You can configure the features of the Outputs Functions marked in the list Output Functions in the pane Edit Output Functions.
To configure a newly added Output Function, do the following:
Enter a reasonable name for the Output Function in the field Label. This name may be up to 10 characters long. Please consider that for a maximum of 120 Output Functions, a suitable name is important for the clarity of the Config.
Insert a new condition row; use the button . Now mark the row that you want to change. As a result, the three buttons below the list become active.
Click on the button , to open the Logic Sources Window and to activate it. Select the desired Logic Source and assign it with the button . Alternatively, you can also move the Logic Source directly to the desired location in the first column of the list by Drag&Drop. The first row of the list always contains the condition None, which can not be changed.
Assign the audio source to the marked row. Therefore, click on the buttons and , to open the Audio Sources Window or to activate it. Now select the desired source and adjust the level with the potentiometer in the Audio Sources Window. To change the level, click and hold the potentiometer button. If you now move the cursor to the left or the right holding the mouse button at the same time, you can change the level. Alternatively, you can also click on the button, hold the mouse button and change the set value with the following cursor keys:
+ 1dB steps arrow right or arrow up - 1dB steps arrow left or arrow down Off Pos 1 +20dB End + 10dB steps PageUp - 10dB steps PageDown To shift the phase of the selected audio source by 180 degrees, activate the checkbox Phase Reverse.
In the Audio Sources Window, you also find a drop down menu with potentiometers. Here you can select a potentiometer the level of which will be added to the value already configured. If e.g. you have set the level of the audio source to -3dB and the selected potentiometer is set to -15 dB, the signal will be attenuated by a total of -15dB + (-3dB) = -18dB. Select the desired potentiometer or use the entry None, if you do not want to use a potentiometer.
As potentiometers, the functions described in the section Potentiometer are available, furthermore the Global Potentiometers 1 to 20. (see also Potentiometers )
Global potentiometers can be adjusted by a fader of one of the Devices defined in the project or using a script. (see Channel Assignment – Assigning Fader Channels and DSP Processing)
Furthermore, there are the following options for the configuration of Output Functions:
To delete a complete condition row from the Output Function, select it and use the button .
The functions Insert Condition, Select Condition, Source 1, Source 2 and Remove Condition can be carried out for the selected row using the contextual menu.
You can configure the conditions and the audio sources of the selected row directly by double clicking into the corresponding column.
You can change the priorities of the conditions by moving the list entries via Drag&Drop.
In each DSP Module RM420-848L and RM420-848M, 40 Output Functions are computed giving a maximum of 120 per Device. Since the Dual MADI Modules RM420-422S occupy several channels on the TDM bus system that are normally used for Output Functions, the configuration of these modules influences the maximum number of Output Functions.
In the following table you find the total number of Output Functions for the different combinations of DSP modules and the Dual MADI module:
| Var. | Number of RM420-848L, 40 mono Output Functions each | Number of RM420-848M, 40 mono Output Functions each | Number of RM420-848M + RM420-422S,16 mono Output Functions each | Number of available Output Functions |
|---|---|---|---|---|
| A | 1 | 40 | ||
| B | 2 | 80 | ||
| C | 1 | 40 | ||
| D | 2 | 80 | ||
| E | 3 | 120 | ||
| F | 0 | 1 | 16 | |
| G | 0 | 2 | 32 | |
| H | 1 | 1 | 56 | |
| I | 0 | 3 | 48 | |
| K | 1 | 2 | 72 | |
| L | 2 | 1 | 96 |
The load of the Output Functions is indicated with the Output Functions bar graph below the project tree. When exceeding a load of 100%, the bar changes its color from blue to red.
Output functions can be used up to 100% without limitations.

