If you operate several RM4200D within the same project, one device can access audio sources on another Device if necessary. You do not need a separate audio link between the Devices for each source, but you can use up to ten Global Pool Lines. Each Global Pool Line you can carry any signal from the remote Device. Which signals are input to the Global Pool Line at the remote Device is dynamically controlled by the local Device. Using TCP/IP on the Ethernet, the local Device sends commands to the remote Device, which selects the desired remote signal as input for the Global Pool Line.
Global Pool Lines need Device Links to work. These are physical audio links between two devices and are explained above. The remote device provides the signal to the Device Link, which carries it to the local device. However, the source signal of the remote device is not fixed, but selected dynamically. (see also Device Links)
You can define up to ten Global Pool Lines. Each of these connections uses one Device Link. Here are some typical applications for such connections:
Assign external audio signals to Fader Channels. (see Global Pool Line as Source for a Fader Channel)
Create monitor busses from external audio sources. (see Global Pool Lines as Sources for a Monitor Bus)
Put external audio sources on a Selector Source List. Use this list for a Rotary Monitor Selector. You can than monitor many sources using a Rotary Encoder on the Console. (see Global Pool Line as Source for a Rotary Monitor Selector)
![[Important]](../pics/important.gif) | Important |
|---|---|
When using Global Pool Lines, please mind the following restrictions:
| |
Before you start, make sure the Device Links between the remote Device and the local RM4200D are set up correctly. The outputs of the remote Device need to be connected to the inputs of the local Device. (see also Device Links)
To set up Global Pool Lines, do the following:
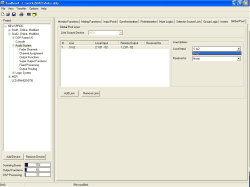
In the project tree, find the desired local Device and select the node Audio System. Click on the tab Global Pool. In the pop up menu Line Source Device, select the remote Device whose inputs you want to access.
Click the button to create a new Global Pool Line. As a result, the Device just selected is greyed out. That means, that you can now only get Global Pool Lines from this Device only.
![[Tip]](../pics/tip.gif)
Tip If you decide later on you want another Device as source for the Global Pool Lines, you have to remove all entries from the list first. Only than you can select another Device as signal source.
From the right pop up menu Local Input select the local input you want to connect to the remote Device via the Device Link.
In the pop up menu Reserve for, leave the default value None unchanged.
Now the Global Pool Line is defined. Repeat the process for more Global Pool Lines. If necessary, change the values in the area Line Options.
You can use Global Pool Lines to switch external audio sources onto local faders. For this to work, you need at least one Global Pool Line with no reservation (value None in the pop up menu Reserve for).
To create a Global Pool Fader, do the following:
In the project tree, change to the node Audio System / Fader Channels. Click on the button to create a new Fader Channel. (see also Fader Channels – Configuring Signal Sources for Faders)
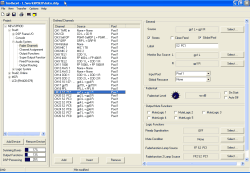
In the upper part of the dialog, activate the checkbox Global Pool.
If you now open the Audio Sources Window, you can access the audio sources of the remote Device. Select one of them as source for the Fader Channel.
You can now use the Fader Channel you have just created exactly like any other Fader Channel carrying a local audio input.
![[Important]](../pics/important.gif) | Important |
|---|---|
You can create up to 150 Fader Channels which have a signal from a remote Device as input. However, at any one time you can only use ten of these Fader Channels simultaneously. This limit is caused by the maximum number of Global Pool Lines, which is ten. If all ten lines are used, you can not use another Global Pool Fader Channel. If all available Global Pool Lines are used, all other Fader Channels with remote audio signals as source are hidden from the local Fader Pool. You can only access local Fader Channels, until at least one Global Pool Fader Channel is removed from the Console again. | |
If you want to monitor audio inputs of a remote Device you can use Global Pool Lines. However, before you can assign a Global Pool Line as source to a Monitor Bus you have to reserve the Global Pool Line first. Only than you can access the audio sources of the external Device.
![[Important]](../pics/important.gif) | Important |
|---|---|
You need to reserve the Global Pool Line for exactly the desired Monitor Bus, otherwise you will not be able to access the audio sources of the remote Device! | |
To configure the Monitor Bus, do the following:
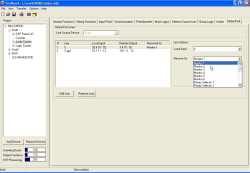
In the project tree, select the node Audio System and click on the tab Global Pool. Select the desired Global Pool Line from the list or create a new one. In the pop up menu Reserve for select the Monitor Bus you want to use with this Global Pool Line. Remember which Monitor Bus you have selected. In the project tree, change to the dialog Audio System / Monitor Functions. If you look at the Monitor Bus you have just assigned a Global Pool Line to, you will see the string Global Pool in the column Info.
In the project tree, go to the node Console and click on the tab Keys. Select the key you want to use for monitoring in the Control Module.
From the pop up menu Function select the entry Monitor Bus. The pop up menu Monitor Bus appears, select the Monitor Bus there you used in step 1 to reserve the Global Pool Line. The checkbox Global Pool will be enabled.
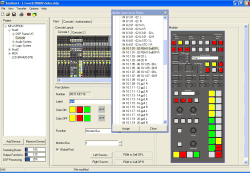
Tick the checkbox Global Pool. If you open the Audio Sources Window now (key F6), you will see the audio signals of the remote device connected to the Global Pool Line. The name of the remote Device is shown in the title bar of the Audio Sources Window. (see also Audio Sources)
Assign the signals of the remote Device you want to monitor to the fields Source Left and Source Right. Define label and lamp colors for the key.
![[Note]](../pics/note.gif) | Note |
|---|---|
If you configure a monitor key, the checkbox Global Pool will be disabled first. It will be enabled automatically if you select a Monitor Bus for which a Global Pool Line is reserved. If you change the reservation of a Global Pool Line to another Monitor Bus, you can not monitor the external signals anymore. Next to the checkbox Global Pool the message Monitor Bus without pool line! is displayed. However, the assignment of the external audio source to this monitor key is not lost. If you change the reservation of the Global Pool Line back, it will work again. That way, you can change the Monitor Bus without losing the assignment of all external sources. | |
![[Important]](../pics/important.gif) | Important |
|---|---|
Sometimes you want to re-use a local Monitor Bus for external signals on a Global Pool Line. If you have already defined a key for this Monitor Bus and want to re-use it, too, do the following: First, set the source for the monitoring key to None. Second, tick the checkbox Global Pool. Now, select the desired audio signal from the external Device. | |
Sometimes you want to access a certain number of external audio sources from a Rotary Monitor Selector. As described in the last section, you need to reserve a Global Pool Line for the Rotary Monitor Selector, too.
To setup the Rotary Monitor Selector, do the following:
In the project tree, select the node Audio System and click on the tab Global Pool. Select the desired Global Pool Line or create a new one. In the pop up menu Reserve for select one of the Rotary Monitor Selectors. Remember, which selector you have chosen. Change to the dialog Audio System / Monitor Functions in the project tree. In the lower half of the dialog find the entry for the Rotary Selector. In the column Info the value Global Pool will be displayed. (see also Rotary Monitor Selector)
Click on the tab Selector Source Lists. Choose a list to contain the external audio sources. In the field Label, give it a descriptive name (for example“Global Sources”). (see also Selector Source Lists)
Click the button to add a new audio source to the list. In the field Display Text, give it a descriptive name. This name will be shown on the display of the Console.
Tick the checkbox Global Pool. In the column Info of the list the message Global Pool is shown. Now, open the Audio Sources Window. You will see the audio signals of the external Device you reserved a Global Pool Line for in step 1. Choose the desired signals for the fields Source Left and Source Right. If you now read the message Selector without Pool Line! in the column Info, please ignore it for the moment. It is there, because the Selector Source List has not been assigned to a Rotary Selector yet. It will disappear as soon as this assignment is complete.
Click on the tab Monitor Functions. In the lower list, select the Rotary Monitor Selector you have reserved a Global Pool Line for in step 1. Now use the pop up menu Select Source List to assign the Selector Source List you were working with in steps 2 to 4.
Go back to the tab Selector Source Lists. Select the list you have just changed again. The warning message in the Info column should have disappeared, because the list is now assigned to a Rotary Monitor Selector.
Repeat steps 3 and 4 at will, until you have put all desired external sources into the list.
![[Tip]](../pics/tip.gif)
Tip If you want, you can mix local and remote signal source within the same Selector Source List.
As usual, you can assign a Selector Source List with external sources to several Rotary Monitor Selectors. However, make sure you reserve a Global Pool Line for each Rotary Monitor Selector that will provide external sources! You can reserve Global Pool Lines for the first 15 of the 30 available Rotary Monitor Selectors.
![[Important]](../pics/important.gif) | Important |
|---|---|
You can not use Selector Source Lists containing external sources as alternative return lines for Clean Feeds! Furthermore, lists containing external sources which are linked to a Rotary Monitor Selector via a Global Pool Line can not be used in the dialog Mixing Functions. They are not displayed in the pop up menu Output Selector Source List. (see also Mixing Functions – Configuring Internal Buses ) | |


