With this command, you transfer a new firmware version into all modules of a RM4200D Device. This process can last several minutes depending on the size of the actual RM4200D system. You should not press any keys or move any faders while the transfer is running!
![[Tip]](../pics/tip.gif) | Tip |
|---|---|
Update the firmware only if really necessary. If your RM4200D system runs stable with an older firmware version, there is no reason to update! | |
![[Warning]](../pics/warning.gif) | Warning |
|---|---|
Do not try to operate modules with different firmware versions within the same RM4200D! This will cause unpredictable behaviour of the system and is strongly discouraged by DHD! However, this situation can occur, if you change a module for a spare part or if you built a RM4200D from pre-used modules. In these cases, first reset the system from the Maintenance Window and than update the firmware. (see also Troubleshooting) | |
![[Important]](../pics/important.gif) | Important |
|---|---|
Before you start updating the firmware of your RM4200D, make sure you have read the following information:
| |
| Warning |
|---|---|
Do not attempt a firmware update using a WAN connection between the Toolbox4-PC and the RM4200D. Data throughput and latency on such links are sometimes unpredictable and can cause problems during the update. If you need to update remote systems, use a remote control software like Norton PC Anywhere, Timbuktu Pro or VNC. Use this software to remote control a PC within the same local network as the RM4200D. Run the Toolbox4-Software on this PC. (see also Connections using Wide Area Networks) | |
If your RM4200D system does not use Global Functions, you can update its firmware without using a project file. You can just connect to the systems from the Toolbox4 software and upload the new firmware.
To update the firmware, do the following:
Download the matching versions of the Toolbox4 software and firmware from the DHD support site. You can recognize firmware files by the extension .upd.
Replace the existing old version of the Toolbox4 software on the PC by the new one.
Start the new Toolbox4 software and connect to the Device the firmware of which you want to update. (see also Connecting the Software to the Devices)
Create an empty Device by clicking on the button in the Toolbox4 software.
Download the current Config of the DSP frame into the newly created Device in the Toolbox4 software.
Save this Config as backup on the hard drive.
Upload the Config again back onto the Device that you want to update. (This way you have adjusted the internal structures of the Config to the new software version.)
Open the Maintenance Window using the command from the menu or press the key F7. Make sure the desired Device is selected in the Device tree.
Select the command from the menu. A file dialog appears in which you have to select the firmware file downloaded in step 1.
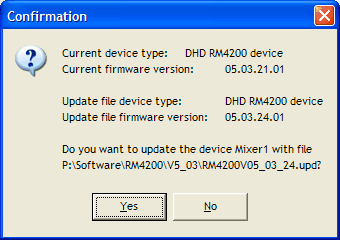
The Toolbox4 software compares the firmware version in the Device with the firmware version of the file you just selected. The result is shown in a dialog, read it carefully. In this dialog, you can cancel the whole process or carry on.
Click the button in the confirmation dialog if you want to cancel the update. As soon as you click the button, the firmware transfer starts and a progress bar is shown. This process can take up to 25 minutes, depending on the size of the RM4200D system. If you use the serial port, the update can take up to 45 minutes. During the upload, click the button in the progress dialog to cancel the update completely.
Warning You should not press any keys or move any faders on the Console while the update is running!
After transferring the new firmware successfully, a dialog appears asking you if you want to restart the Device or not. If you refuse, the old firmware runs until the next restart, otherwise the Device is reset and the new firmware is started.
You can check the version of the new firmware using the command from the menu.
If your RM4200D system does use Global Functions, you need a project file to update its firmware. (see also Global Logics )
| Warning |
|---|---|
The relations between all Global Logic Functions are stored in the project file. If you update the firmware without a project file, all Global Logic Functions will be lost after the update! | |
To update the firmware of a RM4200D using Global Logic Functions, do the following:
Download the matching versions of the Toolbox4 software and firmware from the DHD support site. You can recognize firmware files by the extension .upd.
Replace the existing old version of the Toolbox4 software on the PC by the new one.
Start the new Toolbox4 software and connect to the Device the firmware of which you want to update. (see also Connecting the Software to the Devices)
Open the project file in the Toolbox4 software. In the device tree, select the Device you want to update.
Download the current Config of the DSP frame into the Device you have just selected in the Toolbox4 software.
Save this Config as backup on the hard drive.
Upload the Config again back onto the Device that you want to update. (This way you have adjusted the internal structures of the Config to the new software version.)
Open the Maintenance Window using the command from the menu or press the key F7. Make sure the desired Device is selected in the Device tree.
Now select the command from the menu. A file dialog appears in which you have to select the firmware file downloaded in step 1.
The Toolbox4 software compares the firmware version in the Device with the firmware version of the file you just selected. The result is shown in a dialog, read it carefully. In this dialog, you can cancel the whole process or carry on.
Click the button in the confirmation dialog if you want to cancel the update. As soon as you click the button, the firmware transfer starts and a progress bar is shown. This process can take up to 25 minutes, depending on the size of the RM4200D system. If you use the serial port, the update can take up to 45 minutes. During the upload, click the button in the progress dialog to cancel the update completely.
Warning You should not press any keys or move any faders on the Console while the update is running!
After transferring the new firmware successfully, a dialog appears asking you if you want to restart the Device or not. If you refuse, the old firmware runs until the next restart, otherwise the Device is reset and the new firmware is started.
You can check the version of the new firmware using the command from the menu.
Usually you update the firmware of all modules in a RM4200D simultaneously. During this process, the firmware data is transmitted over Ethernet and TCP/IP to the DSP frame.
However, sometimes you might want to update just a single module, for instance to prepare a replacement part. In this case you do not need a complete RM4200D, you can update this single module using a serial connection instead.
To update the module, do the following:
First, find out which firmware version the new module needs. To get this information, read out the firmware version currently running on the RM4200D that will get the new module. (see also Information (). If necessary, get the matching versions of the firmware and the Toolbox4 software.
Connect the module to a 24 V power supply. All modules get their power from the CAN bus cable. Therefore, you might need to build an adapter for the CAN bus plug. You will find the necessary circuit digrams in volume 5 of this manual Part5 – Installation Guide.
Use a serial cable to connect the serial port of the module to the PC running the Toolbox4 software. Do not use a USB/Serial adapter, but a real serial interface. Remember, which COM port of the PC you connect the cable to.
When you have completed the wiring, switch on the 24 V power supply. The displays and LEDs of the module should light up now.
Go to the Toolbox4 software and open the Maintenance Window. In the DHD Connection Dialog, use the option COM port to connect via the serial cable. Make sure you select the correct COM port.
Check the current firmware version in the module. If necessary, update the firmware using the command from the menu. A file dialog appears, in which you have to select the desired firmware file.
The Toolbox4 software compares the firmware version in the Device with the firmware version of the file you just selected. The result is shown in a dialog, read it carefully. In this dialog, you can cancel the whole process or carry on.
Click the button in the confirmation dialog if you want to cancel the update. As soon as you click the button, the firmware transfer starts and a progress bar is shown. This process can take up to 25 minutes. During the upload, click the button in the progress dialog to cancel the update completely.
Warning You should not press any keys or move any faders on the module while the update is running!
After transferring the new firmware successfully, a dialog appears asking you if you want to restart the module or not. If you refuse, the old firmware runs until the next restart, otherwise the module is reset and the new firmware is started.
You can check the version of the new firmware using the command from the menu.
Occasionally, firmware updates may fail. If this happens to you, read the following information and try again:
Save the current Config to a file. Next, create an empty Config and upload it to the Device. Update the firmware. If this was successful, load the original Config from the file and restore it back to the Device.
Check, if the data transfer from the PC running the Toolbox4 software to the RM4200D has to travel on a network with high traffic. If this is the case, connect the PC and the RM4200D directly using a crossed Ethernet cable.
If the RM4200D consists of modules which originate from several different other RM4200D systems, the modules can have different firmware versions. In this case, first reset the whole Device from the Maintenance Window. Now update the firmware. (see Maintenance Window)
![[Note]](../pics/note.gif)
Note The reset triggered from the Maintenance Window is more “radical” than power-cycling the DSP frame, because Setup 0 is loaded after the reset.