You can change many settings of the RM2200D from the mixing desk. These settings will even stay permanent when the system is powered off. However, sometimes you would like to save different settings for different situations. For example, you could use the RM2200D both as On-Air self-operating mixer and for production. Both applications have different requirements and each needs different settings . With the RM2200D, you can easily store your settings in Setups. A setup is basically a set of parameters which is stored within the RM2200D hardware for later use. There are three different kinds of setups:
Channel Setups. A Channel Setup stores the parameter settings for one audio channel. In the display of the mixing desk they are labeled CHSETUP <No.>. You cane store up to 20 Channel Setups.
User Setup. A User Setup stores the current state of the whole mixing desk including the current settings of all channels. In the display of the mixing desk they are labeled SETUP <No.>. You can store up to six User Setups.
Basic Setup. This special setup is similar to a User Setup, it also stores the state of the whole system. However, you cannot save or change it from the mixing desk, but have to use the RM2200D software to do so. The Basic Setup is loaded after a reset of the DSP frame.
(see Full Screen Display)
![[Important]](../pics/important.gif) | Important |
|---|---|
Except for the Basic Setup, you can manage all your setups from the mixing desk, as described in the next section. However, you can also use the RM2200D software to store and load setups. You have to use it to store the Basic Setup. | |
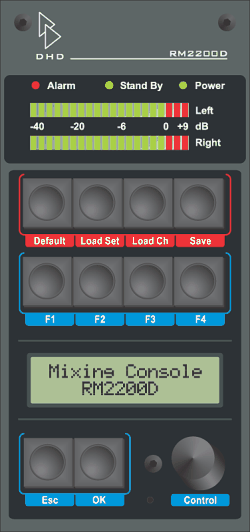
To manage the setups of the RM2200D you use the four red buttons on top of the Master Control Module as well as the Control Knob and the keys Esc and OK below the LC display. (See the following figure.)

![[Note]](../pics/note.gif) | Note |
|---|---|
You can also use the RM2200D software to save and load all setups. Please note, that in this case you need to press the Select key in any fader channel on the mixing desk to gain access to the dialog section Presets in Full Screen mode. (see Full Screen Display) | |
To load the Basic Setup, press and hold the Default key for a few seconds. The display shows Loading and the Basic Setup is loaded. To save the Basic Setup, use the RM2200D software. (see Full Screen Display)
To save a User Setup, do the following:
Adjust all fader channels and other settings at will. When you have finished your adjustments, make sure no Select keys are active.
Press the red Save key. The display shows SAVE SETUP <no.>.
Turn the Control Knob until the display shows the number you want to save your setup under. Press the OK key to confirm your selection. The setup is saved immediately. To cancel the operation, press the Save key again.
To load a User Setup, do the following:
Press the red Load key. The display shows LOAD SETUP <no.>.
Turn the Control Knob until the display shows the number of the setup you want to load. Press the OK key to confirm your selection. The new setup is loaded immediately. To cancel the operation, press the Load Set key again.
To save a Channel Setup, do the following:
Press the Select key on the desired fader channel. Adjust all settings at will using the Master Control Module.
While the Select key is still active, press the red Save key. The display shows SAVE CHSETUP <no.>.
Turn the Control Knob until the display shows the desired number to save your setup under. Press the OK key to confirm your selection. The new setup is saved immediately. To cancel the operation, press the Select key again to deactivate it.
Press the active Select key again to deactivate it.
To load a Channel Setup, do the following:
Press the Select key on the desired fader channel.
Press the red Load Ch key. The display shows LOAD CHSETUP <no.>.
Turn the Control Knob until the display shows the number of the setup you want to load. Press the OK key to confirm your selection. To cancel the operation, press the Select key again to deactivate it.
Press the active Select key again to deactivate it.
![[Important]](../pics/important.gif) | Important |
|---|---|
You can only load a channel setup into a fader channel if this is allowed for the input it has been assigned. You can allow or deny this for any input signal in the section Frame I/O of the configuration dialog. (see also Frame I/O - Configuring the DSP Frame) | |