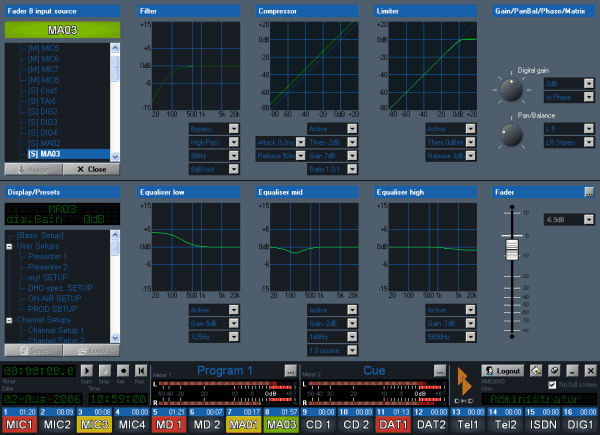
The RM2200D software changes to Full Screen Display, as soon as you press a Select key in one of fader channels on the mixing desk or click on one of the channel status indicators in the RM2200D software. The Full Screen Display is shown in the following picture:
It works like this: If you change some settings on the mixing desk, the monitor display in the RM2200D software will reflect this change in real time. The other way round, you can use the interface elements RM2200D software to change the settings in the mixer “live”. Thus, the control elements of the selected channel on the mixing desk and the software work in parallel.
![[Important]](../pics/important.gif) | Important |
|---|---|
The Full Screen Display is not activated, when the checkbox No full screen is checked! | |
The state of the selected channel is displayed in several panes. If you change any value in these panes, the new values are transmitted “live” to the RM2200D. The following list gives you an overview of the values you can change in Full Screen Display:
Input Source: Here you select which audio signal is assigned as input to the selected fader channel. To change the current selection, select the new input in the signal list and click the button . The labels for the name of the selected input will change accordingly. Please note, that in the signal list “[M]” denotes a mono input, “[S]” a stereo input.
Presets: This section allows you to save the current state of the selected channel to a setup. You can also load an existing setup into the selected channel. You can use both User and Channel Setups to store the information. Select the desired setup in the list and click the button or . Please note, that the setups are stored within the RM2200D, not on the PC! (see also Using Setups)
Filter: Here you can change the settings for the variable high pass or low pass filter:
Parameter Range Frequency 22Hz … 20000Hz Characteristics curve high pass or low pass Filter grade 6, 12, 18 or 24 dB/octave Compressor: Here you can change the settings for the compressor:
Parameter Range Threshold -50dB … +10dB Ratio 1.0:1 … 5.0:1 Gain 0dB … 30dB Attack time 0.2ms … 50ms Release speed 3dB/sec … 20dB/sec Limiter: Here you can change the settings for the limiter:
Parameter Range Treshold -20dB intern … +20dB intern Release time 50ms … 10s Gain/PanBal/Phase/Matrix: Here you can change the settings for analog and digital gain, switch phantom power for microphone inputs on or off and reverse the phase of the input signals. For mono inputs you can set the panorama, for stereo inputs the balance. For stereo inputs you can define how the two input channels (left and right) are treated. You can change the following settings using the pop-up menus and rotary knobs (click the knob and drag with the mouse to rotate):
Parameter Range Analog gain (RM220-122 only) 0dB … 50dB 48V phantom power (only RM220-122) on or off Digital gain -20dB … +20dB Phase reverse on or off Panorama (mono input only) Balance (stereo input only) You can use the following channel mappings when dealing with stereo inputs:
Displayed Value Channel mapping LR stereo left to left and right to right LL mono left to left and left to right RR mono right to left and right to right RL reverse stereo right to left and left to right Mono 0dB left + right, summation with 0db Mono -3dB left + right, summation with -3dB Mono -6dB left + right, summation with -6dB Equaliser low, Equaliser mid, Equaliser high: These are three independent equalisers; you can set up any of them seperately. You can select from three characteristics: shelving low, shelving high and full parametric band:
EQ type Parameter Range Shelving low (EQ low) Frequency 22Hz … 1000Hz Gain -15dB … +15dB Parametric bell (EQ mid) Frequency 22Hz … 20000Hz Gain -15dB … +15dB Bandwith 0.3 … 3.0 octaves Shelving high (EQ high) Frequency 1000Hz … 20000Hz Gain -15dB … +15dB
Busses:In this section you can assign the signal of the selected channel to either Program Bus 1 (PGM 1 ON) or Program Bus 2 (PGM 2 ON) or to both. Use the top two pop-up menus for this selection.
To change the Aux settings for the selected channels, use the two rotary knobs to set the gain. Use the pop-up menus next to them to set the Aux type:
Parameter Range Aux 1 gain off, -60dB … +15dB Aux 1 type Pre Fader, After Fader, Pre Fader Switch (Pre Fader while fader is closed; off when fader is opened.) Aux 2 gain off, -60dB … +15dB Aux 2 type Pre Fader, After Fader, Pre Fader Switch (Pre Fader while fader is closed; off when fader is opened.)
