The routing software is used to interconnect inputs and outputs of a remote-controlled DSP frame. An interconnection of input- and outputsignal is also called crosspoint.
![[Note]](../pics/note.gif) | Note |
|---|---|
You can only connect one inputsignal with one output. More than one inputsignals can not be connected same time with one single output. On the other side, you can connect the same input signal to any number of outputs. | |

You have several possibilities to set or release crosspoints:
To set or release crosspoints manually. Therefore two different views are available: the routing matrix and the routing table. (see Using the Routing Software)
If you need to set a larger number of crosspoints at the same time, you can save this set of crosspoints as a script. Such scripts may be assigned inside the routing software to so called Hot Start Buttons. To start a script which changes defined crosspoints, you simply press the related Hot Start Button. The assigned script is executed and all defined crosspoints will be set. (see Using Hot Start Buttons)
The Routing Software enables the scheduled execution of scripts. To plan your individual events an internal tool can be used, called the Scheduler. This tool represents an optional feature, which needs to be ordered separately. (see Scheduler – Connecting crosspoints time controlled)
| Note |
|---|---|
The Routing Software offers internal security mechanisms to prevent unaware connections. Additionally, you can restrict any access to the setup by a password protection. (see Security) | |
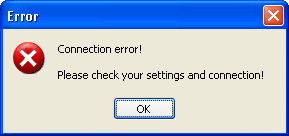
If you start the Routing Software for the very first time, you will probably get an error message. This dialog warns, that the software has not been connected to any RM4200D device before and that no configuration data could be found. Therefore the application is not able to connect to an RM4200D device. You will receive a similar warning, if the software still has been used on the same PC, but a connection to the last connected device could not be established.
The reason for this behaviour during the first startup is as follows:
During startup, the Routing Software requires basic configuration information to display a router’s current state visually. This information is not available if the software is started primerly. It needs to be loaded before. Two „loading“-options are available:
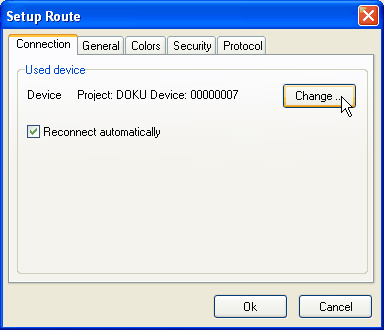
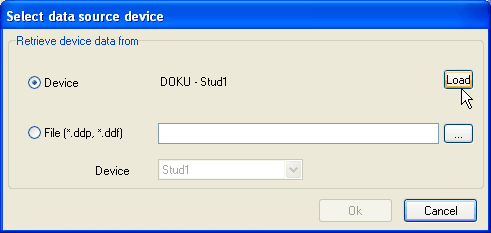
You may open an existing Toolbox4 project file and select a specified device: Use the I/O Setup command in the Setup menu. If you have not already selected a project file, the Select Data Source Device dialog automatically opens. If a project file still has been loaded, and you would like to exchange the selected project file, click on the Change Device button in the I/O Setup dialog. The Select Data Source Device dialog is opened. Please activate the radiobutton File (*.ddp, *.ddf). Clock on button …, and choose the required Toolbox4 project file. Use the popup menu Device, to choose the desired device.
Alternatively, you can download the current configuration from a still configured RM4200D device. Therefore you use the command from the menu . (see Preferences - Assignment of Pre-Settings)
Click on button to open the DHD Connection dialog. Select the device you would like to use for downloading the current information. If you would like to configure the Routing Software to automatically reconnect to the specified device, please check Reconnect automatically. From now on, please proceed exactly as described in the first alternative. Open dialog Select data source device. The just selected device should be displayed.
Activate radiobutton Device and click on . The current state of the router will be transferred to the software.
You have shifted the software into an working state.
The configuration will be stored in the fileIO.CFG.This file is located in the same directory as the Routing Software.
When starting the Routing Software, the main window is displayed at first. The largest part of the window is used for showing the current state of the connected router.
This view has two basic modes: the Routing Matrix and the Routing Table. In the routing matrix view, all inputs and outputs of the router are displayed checkered, crosspoints are shown different colors. In the routing table view, all configured crosspoints are displayed in text-format.
![[Tip]](../pics/tip.gif) | Tip |
|---|---|
If names of input- and outputsignals appear insignificant, you may change them. Please use the command from the menu . (see Rename I/Os - Renaming Signals) | |

The main window of the Routing Software exists of the following parts (from top to down):
Menu bar and icons. The menu bar contains the menus , , and . With the 4 icons below you can directly call to frequently used functions of the software: File Open, File Save, Script Editor and I/O Setup.
Select visible categories. Use these 5 checkboxes to select, which audio sources are displayed in the routing views. In the I/O Setup dialog you can assign the available input signals of the DSP frame to categories and change the names of the categories, if needed. Switching the checkbox of a category to on will display all assigned signals in the routing view; besides, the signals will be masked. (see I/O Setup -Assigning Inputs and Outputs)
Hot Start. This area is reserved for the configured Hot Start Buttons, which can be used for starting predefined routing scripts by a single mouse-click. Only configured buttons will be displayed. You may define your own, individual Fot Start Buttons using the dialog Hot Start Configuration. Key F10 or command from menu will switch the Hot Start area on or off. (see also Using Hot Start Buttons)
Routingstate. The largest part of the window is used for displaying the current routing state. The state of the router is shown in two possible modes, the Routing Matrix or the Routing Table. Below the routing view, a caption describes the meaning of the different colorcodes of the shown crosspoints. Use the commands and from the menu , to switch betwenn both views.
Protocolarea. This area protocols each single switching of crosspoints. The protocol registers the switching-time and which input signal has been routed to which output. With this information, you can extactly determine, when a specified coupling was done. Use the scrollbar to show older protocol entries. Additionally, all entries will be written into a logfile. (see also Protocol)
Statusbar. At the lower edge of the window, current state information will be shown:
Time is the current system time, format is hh:mm:ss.
Connected to: displays the Project ID and Device Name of the system, which is connected with the software. If the software is without any connection, Not connected is indicated.
Next Event: shows the time of the next routing event planned with the Scheduler dialog. If no routing event is scheduled, the entry switches to 0:00:00 - No more Events today. (see also Scheduler – Connecting crosspoints time controlled)