The software to configure the Panel is called TFTConfig. It is included within every shipment.
TFTConfig is a normal Windows program. It does not require any additional DLLs or other files. For installation, copy the program file on to the hard drive of your PC. To remove the program, just delete its program file. Start the software by opening the file TFTConfig.exe.
![[Important]](../pics/important.gif) | Important |
|---|---|
The usage of the TFTConfig software is only specified for Windows XP and Windows2000 PC systems. | |
You can use the software without the RM420-015 hardware, e.g. to change or check configurations “offline”. However, in most cases the configuration PC is connected to the Display.
![[Note]](../pics/note.gif) | Note |
|---|---|
Using Ethernet to connect the TFTConfig software to the RM420-015 TFT Display requires the correct configuration of the IP addresses. | |
With this command you can generate a new, empty configuration file. Alternatively you can create a new file by hitting the following icon:

Use this command to open an existing TFT configuration file. The dialogue for file selection is displayed; only RM420-015 configuration files are shown. The files bear the suffix*.TFT .Alternatively you can open the file dialogue by hitting the following icon:

With this command you can save the currently open TFT configuration. If you have started with a new file, you will be asked for a filename. A file dialogue opens in which you can enter name and location for the new file. If a file already exists, the existing file will be overwritten.
You can also call the command by hitting the following icon:

With this command you can save the currently open TFT configuration as a file with another name. A file dialogue opens in which you can enter name and location for the new file. If a file with the same name already exists, you have to confirm the overwriting.
After saving, the script editor progresses in the new file.
The function switches on a test mode for the logic indicators. With activated, the software displays the configured colors for the logic indicators.

You can also call the command by hitting the following icon:

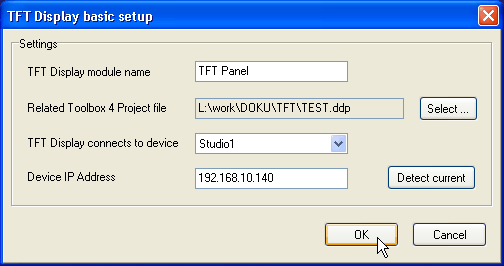
opens a dialogue to specify the interconnection between the TFT display and an RM4200D. In the first text field (TFT Display module name), you can enter a name for the RM420-015 TFT Display. This name is basically used to simplify your work.
Hit the button to choose an RM4200D configuration file (*.ddp) containing the device which should be connected to the TFT display. After selection, all devices configured in your *.ddp file are listed in the TFT Display connects to device menu. Choose the desired device from this list.
The interconnection of TFT display and RM4200D system is based on TCP/IP. Therefore, the display needs to know the current IP address of the RM4200D. Click the button to read the IP address of the desired device.
Finally, hit the button to confirm the settings, or press to discard them.
As already known from the Toolbox4, also the TFTConfig software comes with a maintenance application. It is called Maintenance Window, too, but provides several different options and features.
These changes were necessary because of the completely new hardware and software concept, the RM420-015 TFT Display is based on.
The maintenance window will be explained in a later abstract of this manual.
This command copies the current configuration from the TFTConfig software into the selected RM420-015 TFT Display. First choose the command Load to TFT display. In the DHD connection dialog you can select the desired Device. After confirming the selection, the new configuration is transferred. Due to the small amount of data, the transfering process is quite fast. No process bar will be shown during upload.
![[Warning]](../pics/warning.gif) | Warning |
|---|---|
Loading a new configuration irrecoverably overwrites the older configuration available in the TFT display. Therefore, if in doubt, save the current configuration to file before modifying it using the command Load from TFT display. | |
You can also execute the function Load to TFT display... by clicking on the icon

in the toolbar.
This command loads the configuration from a RM420-015 TFT Display into the TFTConfig software. In the DHD connection dialog, you have to select the corresponding panel, too.
| Warning |
|---|---|
Please remember that the modification caused by the download can not be undone as soon as the project file is saved. Thus, you should always work with copies of the original configuration files. | |
You can also execute the function Load from TFT display... by clicking on the icon

in the toolbar.
In the main window of the TFTConfig software, you can adjust the settings for the level and logic indicators. If you move the mouse cursor over the display layout, all configurable fields will be highlighted.
If you click a highlighted level indicator field, you can configure its label and check, whether it should be enabled or not.

There is no possibility to define an assignment of RM4200D Level Detection signals to the level indicators. This assignment is automatically done. ( 2: RM4200D Level Detections and RM420-015 level indicators have a fixed relation.)
If one of the highlighted logic indicators is clicked, a setup window is opened to define settings. You can set a label for the indicator and assign a color for it. The assignable colors will be shown later, when the Test colors mode is activated.

Clicking the button besides the Logic Source field opens the Logic Sources window as known from the Toolbox4.
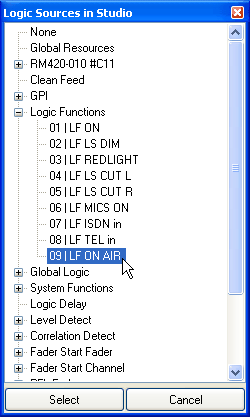
This window shows all available logic sources of the connected RM4200D, which can be assigned to the logic indicators. Select the source you would like to indicate and press . The source will be listed in the Logic Source text field. Whenever this logic source is activated during operation, the indicator will be lit in the configured color.
By clicking the clock symbol a window opens, which enables the user to configure own shortcut labels for the displayed days in the date line beneath the clock. If nothing is changed here, the default values are the english days in 3-digit code (MON, TUE, WED,...).