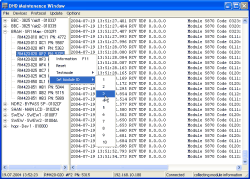
Many menu commands can also be triggered using the contextual menu, when the desired Device or module is highlighted in the Device tree. A click on the right mouse button brings up the contextual menu.
In addition to the menu commands already described, in the Device tree you can use the following commands from the contextual menu:
You can only select this command from the contextual menu, if you have selected a module in the device tree first. During Testmode, all LEDs of the module will be switched on one after another. The lamps inside all keys will light up when the key is pressed and the alphanumeric displays show the current potentiometer values. You can use this function to check all lamps and LEDs as well as to detect which module belongs to which module ID in the device tree.
To activate Testmode, select the desired module in the Device tree and use the command from the contextual menu. In a further submenu you can choose the commands or to switch Testmode on or off.
If you have selected a module in the Device tree, you can use this command to set its module ID. You can read the current module ID in the tree view behind the name of the corresponding module, it is marked by a “ #” (e.g. “#C1” or “#F3”).
To change the ID, first select the desired module in the Device. Now open the contextual menu with a right mouse click and select and then the desired number from a submenu.
![[Important]](../pics/important.gif) | Important |
|---|---|
If by accident you have assigned the same ID to two modules, these two are running “parallel”. This means that all displays and functions are identical on both modules and are running as “mirrors”. | |
![[Tip]](../pics/tip.gif) | Tip |
|---|---|
To find out which module in the Console belongs to which ID, use the function described above. | |
