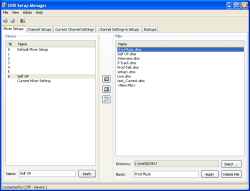
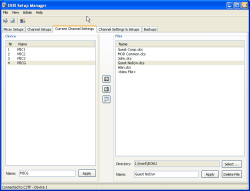
Please use this window if you want to back up individual Mixer Setups (Input Gain, Input Processing and routing parameters of all configured Fader Channels, as well as their assignment to physical faders, stored in the RM4200D) on a PC, or if you want to restore Channel Setups from PC to RM4200D.
The view Mixer Setups also is subdivided in two sections. The left section (Device) displays the Mixer Setups which are stored in the Device.
Nr 0 - Default Mixer Setup: Standard Mixer Setup, is loaded after a software reset (F12 button in the Maintenance window). It is also called Setup 0; it cannot be overwritten from the console. You can only overwrite it with the aid of the Setup Manager or in the Maintenance window of Toolbox4.
Nr 1..6: The Mixer Setups 1..6 can be adjusted user-specifically. You can load or save them during operation via according key functions of the console.
Current Mixer Setting: The Current Mixer Setting represents the current settings of the system.
Underneath the lists, the text field Name is located, via which you can give individual names to the Mixer Setups 1..6 in the Device. These names are stored in the RM4200D and are henceforth available during operation. For entering or changing names, please follow below instructions:
Please establish a connection to the desired RM4200D.
In the window Mixer Setups - Device, please select the Mixer Setup (Nr. 1..6) whose name you would like to change.
Below, in the text field Name, please enter any name. The number of characters is limited to 12. You can use all signs of the character set displayed below.
Hit the Apply button.
By clicking Apply, the entered name is sent to the Device. The respective setup is directly renamed. The entering of a setup name does not influence the operation of an RM4200D.
The names of Setup Nr 0 - Default Mixer Setup and Current Mixer Setting cannot be adjusted. These setups have fixed names.
![[Important]](../pics/important.gif) | Important |
|---|---|
Overwriting setups with new or default parameters does not influence setup names. Names are maintained independently of the setup content until they are deleted using the Setup Manager. | |
Deleting setup names:
Select a Mixer Setup (Nr 1..6).
Delete the entry in the text field Name.
Hit the Apply button.
![[Tip]](../pics/tip.gif) | Tip |
|---|---|
Deleting setup names on the RM4200D (Device) does not influence the parameters stored in the setup. | |
In the right section of the view, you can find those Mixer Setup files, which are located in the selected directory. Files in which individual DHD RM4200D Mixer Setups are stored, always have the ending *.dms. Each *.dms file contains one Mixer Setup.
The directory, in which these files are stored, is shown in the text field Directory. Via the Select... button you can select any directory on the PC, to which you have access.
Below the text field Directory, the text field Name is located, via which you can give an individual name to a selected Mixer Setup file on your PC.
Changing the name of an existing Mixer Setup file:
By clicking Select..., please change to the according directory.
In the window Mixer Setups - Files, select the Mixer Setup file (*.dms), whose name you would like to change.
Below, in the text field Name, please enter any name. The length of the name is preset by the operating system, however it should not supersede 8 characters. You do not have to enter the file ending *.dms manually.
Hit the Apply button..
With the aid of the Delete File button you can delete a selected file. For this, select the file to be deleted and click the button. The file is deleted without confirmation..
With the Setup Manager you can
back up Mixer Setups from RM4200D to your PC. The data transfer
from RM4200D to PC is carried out clicking the
 button between the sections Device and Files.
![[Important]](../pics/important.gif) | Important |
|---|---|
Once a setup file has been overwritten, it cannot be restored anymore. Please imperatively first make sure you have selected the correct Mixer Setup file. | |
For backing up individual setups from the RM4200D as new file on the PC, please follow the instructions below:
Please change to the Mixer Setups register tab.
By clicking the Select... button in the right part of the window, go to the directory in which you want to store the new Mixer Setup file.
In the left section of the window (Device), select the Mixer Setup that you want to copy onto your PC.
In the right section of the window, select the entry <New File>. The transfer arrow changes from inactive
 to active
 .
.In the text field Name, enter any name for the new file. Thus you overwrite the automatic entry “New File...”.
Now, hit the
 button.
The copying process from RM4200D to PC starts. You can see a progress
bar
 in the status bar at
the lower side of the application window.
in the status bar at
the lower side of the application window.After the copying is completed, the bar disappears and the just generated file is added to the list of the stored Mixer Setup files (Files).
Of course you can also overwrite already existing Mixer Setup files with new data from an RM4200D.
Therefore please change to the Mixer Setup register tab.
By clicking the Select... button in the right part of the window, go to the directory in which you want to store the new Mixer Setup file.
3. In the left section of the window (Device), select the Mixer Setup which you want to copy to your PC.
In the right section of the window, select the file that you want to overwrite. The transfer arrow changes from inactive
 to active
 .
.5. If necessary, change the name of the file in text field Name. Now, hit the
 button. The copying process from RM4200D
to PC is started. You can see a progress bar
 in the status bar at the lower side of
the application window.
in the status bar at the lower side of
the application window.After the copying is completed, the bar disappears and the Mixer Setup file has been overwritten.
Considering the fact that setups of several RM4200Ds can be administered on one PC, it is imperative to keep with unambiguous naming conventions.
With the Setup Manager you can
copy Mixer Setups from PC to RM4200D. The data transfer from PC
to RM4200D is carried out clicking the
 button between the sections Device and
Files.
![[Important]](../pics/important.gif) | Important |
|---|---|
Once a setup has been overwritten, it cannot be restored anymore. Please imperatively first make sure you have selected the correct Mixer Setup. | |
![[Warning]](../pics/warning.gif) | Warning |
|---|---|
The overwriting of the Current Mixer Setting with the data of a Mixer Setup file from your PC directly influences the active settings of your RM4200D. Active channels, whose signal is part of a mix during the copying, are not changed for the moment. However, they are accordingly preset (ACC button is blinking). All other channels are overwritten. | |
For copying individual setups from the PC to an RM4200D, please follow the instructions below:
Please change to the Mixer Setup register tab..
By clicking the Select... button in the right part of the window, go to the directory, from which you want to copy the Mixer Setup file.
In the right section of the window, select the Mixer Setup file (*.dms), which contains the according Mixer Setup.
In the left section of the window (Device), select the Mixer Setup you want to overwrite. The transfer arrow changes from inactive
 to active
 .
.Now, hit the
 button.
The copying process from PC to RM4200D starts. You can see a progress
bar
 in the status bar at
the lower side of the application window.
in the status bar at
the lower side of the application window.After the copying is completed, the bar disappears.
With the aid of the Setup Manager you can view the contents of Mixer Setups on an RM4200D or the contents of Mixer Setup files on your PC.
In order to view a Mixer Setup on the RM4200D, please follow the instructions below:
Please establish a connection between the Setup Manager and the RM4200D.
In the main part of the window, change to view Mixer Setups.
In the left section of the window (Device), select the setup (Default Mixer Setup, Mixer Setup 1..6 or Current Mixer Setting) whose contents you would like to view. By setting a mark, you activate the
 icon between the sections Device and File.
Click the
 icon.
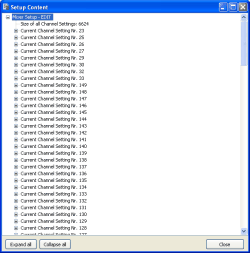
After a short transfer process, a window is opened, in which the
content of the setup is displayed in a tree.(See “The Setup
Content Window” on page 143.)
Alternatively you can also view the contents of a Mixer Setup file. The procedure is similar.
Please establish a connection between the Setup Manager and the RM4200D.
In the main part of the window, change to view Mixer Setups.
In the right section of the window (Files), select the file whose content you would like to inspect. Setting a mark activates the
 icon between
the sections Device and Files.
icon between
the sections Device and Files.Click the
 icon.
Consequently a window is opened, in which the content of the setup
is displayed in a tree. (See “The Setup Content Window” on
page 143.)
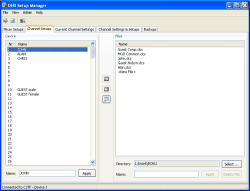
Please use this window if you want to back up individual Channel Setups (Input Gain and Input Processing parameters without direct assignment to a fader channel of the configuration, stored in the RM4200D) on a PC, or if you want to restore Channel Setups from PC to RM4200D.
The view Channel Setups also is subdivided in two sections. In the left section (Device), those Channel Setups are displayed which are stored in the Device.
Nr 1..250: The Channel Setups 1…250 can be adjusted user-specifically. You can load or save them during operation via according key functions of the console.
Beneath the lists, the text field Name is located, via which you can give individual names to the Channel Setups 1..250 in the Device. These names are stored in the RM4200D and are henceforth available during operation.
For entering or changing names, please follow below instructions:
Please establish a connection to the desired RM4200D.
In the window Channel Setups - Device, please select a Channel Setup (Nr 1..250) whose name you would like to change.
Below, in the text field Name, please enter any name. The number of characters is limited to 12.
Hit the Apply button..
By clicking Apply, the entered name is sent to the Device. The respective setup is directly renamed. The entering of a setup name does not influence the operation of an RM4200D.
In the right section of the view, you can find those Channel Setup files, which are located in the selected directory. Files in which individual DHD RM4200D Channel Setups are stored always have the ending *.dcs. Each *.dcs file contains one Channel Setup.
The directory, in which these files are stored, is shown in the text field . Via the button you can select any directory on the PC, to which you have access.
Below the text field Directory, the text field Name is located, via which you can give an individual name to a selected Channel Setup file on your PC.
Changing the name of an existing Channel Setup file:
By clicking Select..., please change to the according directory.
In the window Channel Setups - Files, select the Channel Setup file (*.dcs), whose name you would like to change.
Below, in the text field Name, please enter any name. The length of the name is preset by the operating system; however, it should not supersede 8 characters. You do not have to enter the file ending *.dcs manually.
Hit the Apply button.
With the aid of the Delete File button you can delete a selected file. For this, select the file to be deleted and click the button. The file is deleted without confirmation.
With the Setup Manager you can
back up Channel Setups from RM4200D to your PC. The data transfer
from RM4200D to PC is carried out clicking the
 button between the sections Device and Files.
![[Important]](../pics/important.gif) | Important |
|---|---|
Once a Channel Setup file has been overwritten on your PC, it cannot be restored anymore. Please imperatively first make sure you have selected the correct Channel Setup file. | |
For backing up individual Channel Setups from the RM4200D as new file on the PC, please follow the instructions below:
Please change to the Channel Setups register tab.
By clicking the Select...button in the right part of the window, go to the directory in which you want to store the new Channel Setup file.
In the left section of the window (Device), select the Channel Setup you want to copy onto your PC.
In the right section of the window, select the entry “New File”. The transfer arrow changes from inactive
 to active
 .
.In the text field Name, enter any name for the new file. Thus you overwrite the automatic entry “New File”
Now, hit the
 button.
The copying process from RM4200D to PC starts. You can see a progress
bar
 in the status bar at
the lower side of the application window.
in the status bar at
the lower side of the application window.After the copying is completed, the bar disappears and the just generated file is added to the list of the stored Channel Setup files (Files).
Of course you can also overwrite already existing Channel Setup files with new data from an RM4200D.
Therefore please change to the Channel Setup register tab.
By clicking the Select... button in the right part of the window, go to the directory in which you want to store the new Channel Setup file.
In the left section of the window (Device), select the Channel Setup which you want to copy to your PC.
In the right section of the window, select the file that you want to overwrite. The transfer arrow changes from inactive
 to active
 .
.If necessary, change the name of the file in text field Name. Now, hit the
 button. The copying process from RM4200D
to PC is started. You can see a progress bar
 in the status bar at the lower side of
the application window.
 After the copying is completed, the bar disappears and the Channel Setup file has been overwritten.
Considering the fact that the Channel Setups of several RM4200Ds can be administered on one PC, it is imperative to keep with unambiguous naming conventions.
With the Setup Manager you can
copy Channel Setups from PC to RM4200D. The data transfer from PC
to RM4200D is carried out clicking the
 button between the sections Device and
Files.
![[Important]](../pics/important.gif) | Important |
|---|---|
Once a Channel Setup has been overwritten in the RM4200D, it cannot be restored anymore. Please imperatively first make sure you have selected the correct Channel Setup. | |
For copying individual Channel Setups from the PC to an RM4200D, please follow the instructions below:
Please change to the Channel Setup register tab..
By clicking the Select... button in the right part of the window, go to the directory, from which you want to copy the Channel Setup file.
In the right section of the window, select the Channel Setup file (*.dcs) that contains the according Channel Setup.
In the left section of the window (Device), select the Channel Setup you want to overwrite. The transfer arrow changes from inactive
 to active
 .
.Now, hit the
 button.
The copying process from PC to RM4200D starts. You can see a progress
bar
 in the status bar at
the lower side of the application window.
in the status bar at
the lower side of the application window.After the copying is completed, the bar disappears.
With the aid of the Setup Manager you can view the contents of Channel Setups on an RM4200D or the contents of Channel Setup files on your PC.
In order to view a Channel Setup on the RM4200D, please follow the instructions below:
Please establish a connection between the Setup Manager and the RM4200D.
In the main part of the window, change to view Channel Setups.
In the left section of the window (Device), select the Channel Setup (Nr 1..250) whose contents you would like to view. By setting a mark, you activate the
 icon between the sections Device and File.
Click the
 icon. After
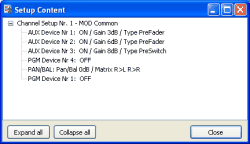
a short transfer process, a window is opened, in which the content
of the setup is displayed in a tree (see figure setman_011.tif). (See “The
Setup Content Window” on page 143.)
Alternatively you can also view the contents of a Channel Setup file. The procedure is similar.
Please establish a connection between the Setup Manager and the RM4200D.
In the main part of the window, change to view Channel Setups.
In the right section of the window (Files), select the file whose content you would like to inspect. Setting a mark activates the
 icon between
the sections Device and Files.
icon between
the sections Device and Files.Click the
 icon.
Consequently a window is opened, in which the content of the setup
is displayed in a tree.(See “The Setup Content Window” on
page 143.)
Please use this view, if you want to back up the current settings of individual Fader Channels (Input Gain and Input Processing parameters of the configured Fader Channels) on a PC, or if you want to copy Channel Setups stored on the PC to particular Fader Channels of an RM4200D.
The view Current Channel Settings is subdivided in two sections. In the left section (Device), those Fader Channels are displayed which are configured in the Device. The name is in accordance with the name shown in the Channel display.
Nr 1..150: The Fader Channels Nr. 1..150 in this list correspond to those, which were generated with the configuration software Toolbox4 under Audio System/Fader Channels in the configuration of the according RM4200D. The total number can be max. 150. Only those channels are displayed which are actually configured.
Beneath the lists, the text field Name is located, via which you can change the name of any Fader Channel (Nr. 1..150) in the Device. These names are temporarily stored in the RM4200D and are henceforth available during operation until
the Device is subject to a software reset,
the Device is switched off or
the configuration is reloaded.
For entering or changing names, please follow below instructions:
Please establish a connection to the desired RM4200D.
In the window Current Channel Settings - Device, please select any Fader Channel (Nr 1..150) whose name you would like to change temporarily.
Below, in the text field Name, please enter any name. The length of the name is subject to the following restrictions:
Fader Module RM420-029: maximum of 8 characters
Fader Module RM420-020: maximum of 4 characters
You can use all signs of the character set displayed in before. (See “Device (Data in the Device)” on page 104.)
Hit the Apply button.
By clicking Apply, the entered name is sent to the Device. The respective Fader Channel is directly renamed. The changing of a channel name does not influence the operation of an RM4200D.
In the right section of the view, you can find those Channel Setup files that are located in the selected directory. Files in which individual DHD RM4200D Channel Setups are stored, always have the ending *.dcs. Each *.dcs file contains one Channel Setup.
The directory, in which these files are stored, is shown in the text field Directory. Via the Select... button you can select any directory on the PC, to which you have access.
Below the text field Directory, the text field Name is located, via which you can give an individual name to a selected Channel Setup file on your PC.
Changing the name of an existing Channel Setup file:
By clicking Select..., please change to the according directory.
In the window Current Channel Settings - Files, select the Channel Setup file (*.dcs), whose name you would like to change.
Below, in the text field Name, please enter any name. The length of the name is preset by the operating system; however, it should not supersede 8 characters. You do not have to enter the file ending *.dcs manually.
Hit the Apply button..
With the aid of the Delete File button you can delete a selected file. For this, select the file to be deleted and click the button. The file is deleted without confirmation..
With the Setup Manager you can back up Current Channel Settings
from RM4200D to your PC. The data transfer from RM4200D to PC is
carried out clicking the
 button
between the sections Device and .
![[Important]](../pics/important.gif) | Important |
|---|---|
Once a Channel Setup file has been overwritten on your PC, it cannot be restored anymore. Please imperatively first make sure you have selected the correct Channel Setup file. | |
For backing up individual Current Channel Settings from the RM4200D as new file on the PC, please follow the instructions below:
Please change to the Current Channel Settings register tab.
By clicking the Select... button in the right part of the window, go to the directory in which you want to store the new Channel Setup file.
In the left section of the window (Device), select the Current Channel Setting you want to copy onto your PC.
In the right section of the window, select the entry <New File>. The transfer arrow changes from inactive
 active
 .
.In the text field Name, enter any name for the new file. Thus you overwrite the automatic entry “New File...”.
Now, hit the
 button. The copying process from RM4200D
to PC starts. You can see a progress bar
 in the status bar at the lower side of
the application window.
in the status bar at the lower side of
the application window.After the copying is completed, the bar disappears and the just generated file is added to the list of the stored Channel Setup files (Files).
Of course you can also overwrite already existing Channel Setup files with new data from an RM4200D.
Therefore please change to the Current Channel Settings register tab..
By clicking the Select... button in the right part of the window, go to the directory in which you want to store the new Channel Setup file.
In the left section of the window (Device), select the Current Channel Setting you want to copy onto your PC.
In the right section of the window, select the file that you want to overwrite. The transfer arrow changes from inactive
 to active
 .
.If necessary, change the name of the file in text field Name. Now, hit the
 button. The copying process from RM4200D
to PC is started. You can see a progress bar
 in the status bar at the lower side of
the application window.
in the status bar at the lower side of
the application window.After the copying is completed, the bar disappears and the Channel Setup file has been overwritten.
Considering the fact that the Current Channel Settings of several RM4200Ds can be administered on one PC, it is imperative to keep with unambiguous naming conventions.
With the Setup Manager you can copy Channel Settings from
PC to RM4200D. The data transfer from PC to RM4200D is carried out
clicking the
 button between the sections Device and Files.
![[Important]](../pics/important.gif) | Important |
|---|---|
Once a Current Channel Settings has been overwritten in the RM4200D, it cannot be restored anymore. Please imperatively first make sure you have selected the correct Current Channel Setting. | |
![[Warning]](../pics/warning.gif) | Warning |
|---|---|
The overwriting of the Current Channel Setting with the data of a Channel Setup file from your PC directly influences the active settings of your RM4200D. Parameters of active channels, whose signal is part of a mix during the copying, are changed without confirmation. | |
For copying individual Channel Setups from the PC to an RM4200D, please follow the instructions below:
Please change to the Channel Setup register tab.
By clicking the Select... button in the right part of the window, go to the directory, from which you want to copy the Channel Setup file.
In the right section of the window, select the Channel Setup file (*.dcs), which contains the according Channel Setup.
In the left section of the window (Device), select the Current Channel Setting you want to overwrite. The transfer arrow changes from inactive
 to active
 .
.Now, hit the
 button.
The copying process from PC to RM4200D starts. You can see a progress
bar
 in the status bar at
the lower side of the application window.
in the status bar at
the lower side of the application window.After the copying is completed, the bar disappears.
With the aid of the Setup Manager you can view the contents of Current Channel Settings on an RM4200D or the contents of Channel Setup files on your PC.
In order to view a Current Channel Setting on the RM4200D, please follow the instructions below:
Please establish a connection between the Setup Manager and the RM4200D.
In the main part of the window, change to view Current Channel Settings.
In the left section of the window (Device), select the Current Channel Setting (Nr 1..150) whose contents you would like to view. By setting a mark, you activate the
 icon between the sections Device and Files.
Click the
 icon. After
a short transfer process, a window is opened, in which the content
of the setup is displayed in a tree.(See “The Setup Content
Window” on page 143.)
Alternatively you can also view the contents of a Channel Setup file. The procedure is similar.
Please establish a connection between the Setup Manager and the RM4200D.
In the main part of the window, change to view Channel Setups.
In the right section of the window (Files), select the file whose content you would like to inspect. Setting a mark activates the
 icon between
the sections Device and Files.
icon between
the sections Device and Files.Click the
 icon. Consequently
a window is opened, in which the content of the Channel Setup is
displayed in a tree. (See “The Setup Content Window” on page 143.)
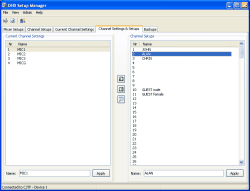
Please use this view, if you want to save the current settings of individual Fader Channels (Input Gain and Input Processing parameters of the configured Fader Channels) as Channel Setups in the RM4200D, or if you want to overwrite them with Channel Setups that are stored in the RM4200D. This mode enables remote control of an RM4200D with the Setup Manager. In control modules, this function also can be configured directly on the console with the key functions “Load Channel Setup” and “Save Channel Setup”.
The register view Channel Settings & Setups is subdivided in two sections. In the left section (Current Channel Settings), those Fader Channels are displayed which are configured in the Device. The name is in accordance with the name shown in the Channel display.
Nr 1..150: The Fader Channels Nr. 1..150 in this list correspond to those, which were generated with Toolbox4 under Audio System/Fader Channels in the configuration of the according RM4200D. The total number can be max. 150. Only those channels are displayed which are actually configured.
Beneath the lists, the text field Name is located, via which you can change the name of any Fader Channel (Nr. 1..150) in the Device. These names are temporarily stored in the RM4200D and are henceforth available during operation until
the Device is subject to a software reset,
the Device is switched off or
the configuration is reloaded.
For entering or changing names, please follow below instructions:
Please establish a connection to the desired RM4200D.
In the window Channel Settings & Setups - Current Channel Settings, please select any Fader Channel (Nr 1..150) whose name you would like to change temporarily.
Below, in the text field Name, please enter any name. The length of the name is subject to the following restrictions:
Fader Module RM420-029: maximum of 8 characters
Fader Module RM420-020: maximum of 4 characters
You can use all signs of the displayed character set.(See “Device (Data in the Device)” on page 104.)
Hit the Apply button.
By clicking Apply, the entered name is sent to the Device. The respective Fader Channel is directly renamed. The changing of a channel name does not influence the operation of an RM4200D.
In the right section of the view Channel Settings & Setups, you can see the Channel Setups that are stored in the RM4200D.
Nr 1..250: The Channel Setups 1…250 can be adjusted user-specifically. You can also load or save them during operation via according key functions of the console.
Beneath the lists, the text field Name is located, via which you can give individual names to the Channel Setups 1..250 in the Device. These names are stored in the RM4200D and are henceforth available during operation.
For entering or changing names, please follow below instructions:
Please establish a connection to the desired RM4200D.
In the window Channel Settings & Setups - Channel Setups, please select a Channel Setup (Nr 1..250) whose name you would like to change.
Below, in the text field Name, please enter any name. The number of characters is limited to 12. You can use all signs of the already mentioned character set.(See “Device (Data in the Device)” on page 104.)
Hit the Apply button.
By clicking Apply, the entered name is sent to the Device. The respective setup is directly renamed. The entering of a setup name does not influence the operation of an RM4200D.
With the Setup Manager you can
copy Channel Setups, which are stored in the RM4200D, to configured
Fader Channels, or you can save their active parameter settings
as Channel Setups in the RM4200D. The data transfer from and to
the RM4200D memory is carried out wit
 h the or
 buttons between the sections Current Channel Settings (left)
and Channel Setups (right).
![[Important]](../pics/important.gif) | Important |
|---|---|
Once a Current Channel Settings has been overwritten in the RM4200D, it cannot be restored anymore. Please imperatively first make sure you have selected the correct Current Channel Setting. The same applies to Channel Setups. Once overwritten, you cannot undo the changes made. | |
![[Warning]](../pics/warning.gif) | Warning |
|---|---|
The overwriting of the Current Channel Setting with the data of a Channel Setup directly influences the active settings of your RM4200D. Parameters of active channels, whose signal is part of a mix during the copying, are changed without confirmation. | |
For assigning individual Channel Setups from the RM4200D memory to a Fader Channel, please follow the instructions below:
Please change to the Channel Settings & Setups register tab.
In the right part of the window, select the Channel Setup, which contains the parameters that you want to assign to a Fader Channel.
In the left section of the window, select the Current Channel Setting you want to overwrite. The transfer arrow changes from inactive
 to active
 .
.Now, hit the
 button.
The loading process within the RM4200D usually is very fast. Thus,
in most cases, no progress bar will appear. After about 1 second,
the Current Channel Setting has been overwritten.
The other way around, you can copy active parameters of a channel into a Channel Setup and thus back them up for further operation. For this, please proceed according to the following:
Please change to the Channel Settings & Setups register tab.
In the left section of the window, select the Current Channel Setting that contains the parameters that you want to store in a Channel Setup.
In the right part of the window, select the Channel Setup you want to write or to overwrite. The transfer arrow changes from inactive
 to active
 .
.Now, click the
 button. The copying process within the RM4200D
usually is very fast. Thus, in most cases, no progress bar will
appear. After about 1 second, the Channel Setup has been overwritten.
![[Note]](../pics/note.gif) | Note |
|---|---|
Names of Fader Channels and names of Channel Setups are unaffected by the copying processes. | |
With the aid of the Setup Manager you can view the contents of Channel Settings and Channel Setups on an RM4200D.
In order to view a Current Channel Setting on the RM4200D, please follow the instructions below:
Please establish a connection between the Setup Manager and the RM4200D.
In the main part of the window, change to view Channel Settings & Setups..
In the left section of the window (Current Channel Settings), select the Channel Setting (Nr 1..150) whose contents you would like to view. By setting a mark, you activate the
 icon between.
Click the
 icon. After
a short transfer process, a window is opened, in which the set parameters
are displayed in a tree. (See “The Setup Content Window” on page 143.)
Alternatively you can also view the contents of a Channel Setup file. The procedure is similar.
Please establish a connection between the Setup Manager and the RM4200D.
In the main part of the window, change to view Channel Settings & Setups..
In the right section of the window (Channel Setups), select the Channel Setup (Nr 1..250) whose content you would like to inspect. Setting a mark activates the
 icon between the left and the right section.
Click the
 icon. After
a short transfer process, a window is opened, in which the set parameters
are displayed in a tree. (See “The Setup Content Window” on page 143.)
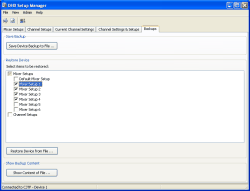
As alternative to the copies of individual Mixer and Channel Setups, the Setup Manager can generate a general backup, a so-called Device Backup, from all setups stored in the RM4200D; this backup is then saved as file on the PC. It can be generated quickly and easily. The backup represents a complete copy of the setup segment, which can just as easily be restored to the RM4200D, either completely or partially. The functions can be accessed via the register tab Backups of the Setup Manager.
 : With the button you can start
the generation of a backup of the RM4200D setups. By clicking on
this button, a window is opened.
Please establish a connection between the Setup Manager and the RM4200D.
Change to the view Backups.
First, please select a directory on your PC, in which you want to store the backup file.
Now, enter a name for the backup file. As file type, DHD Mixer Backup (*.dmb)is automatically selected. The length of the file name is preset by your operating system. You can also select and overwrite an already existing file. However, you need to confirm the overwriting.
![[Important]](../pics/important.gif)
Important When assigning file names, please keep in mind that you can administer different backups of one or even more RM4200Ds with one PC. Therefore, choose an unambiguous file name, from which you can tell, when and from which Device the backup was generated (example: Studio1_200411.dmb).
Hit the Save button. This will start the copying process from RM4200D to PC. You can see a progress bar
 in the status bar. When
the copying process is completed and the backup file is generated,
the progress bar disappears.
The following setups are backed up in the Device backup:
Default Mixer Setup (Setup 0)
Mixer Setup 1..6
Channel Setups 1..250
 : With the button, you can copy complete
backups or backup parts back from the PC to an RM4200D. Before activating
the button, please first select those parts of the backup that you
want to copy into the RM4200D. Please follow this instruction:
Please establish a connection between the Setup Manager and the RM4200D.
Change to the view Backups.
In the section Select items to be restored, please select the checkboxes of the backup parts that are to be copied.
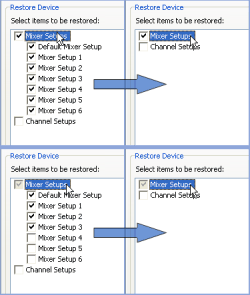
Checking Mixer Setups automatically selects all Mixer Setups (Default Mixer Setup und Mixer Setup Nr 1..6).
You can also select each individual Mixer Setup.
Checking Channel Setups selects all Channel Setups (Nr 1..250).
overwrites all selected setups. If you have not selected all Mixer Setups, the checkbox Mixer Setups is represented in grey.
Click the button.
The following dialogue requests you to select a backup file (*.dmb) from a directory of your PC.
Opening this file starts the copying process. A progress bar
 is displayed in the status bar. It disappears
when the copying process is completed and the selected setups have
been overwritten in the RM4200D by the according data of the backup
file.
The branch for selecting the Mixer Setups, which are to be restored to the RM4200D, can be expanded or collapsed by double-clicking on the entry Mixer Setups.
 : For inspecting the content
of backup files, you can access the according function via the button.
Please establish a connection between the Setup Manager and an RM4200D.
Change to the view Backups.
Clicking on the button opens a window, via which you can select any backup file (*.dmb) on your PC.
Click Open in order to show the content of the file in the Setup Content window.(See “The Setup Content Window” on page 143.)

