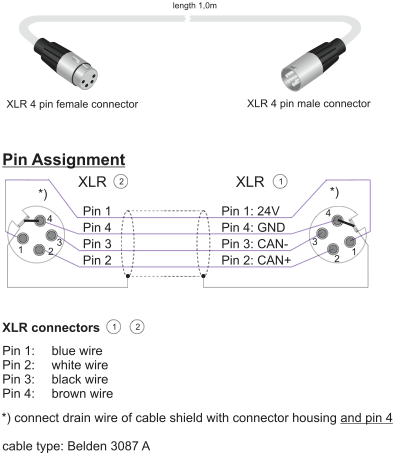
The DSP frame is connected to the control modules via the CAN bus. the CAN bus is a serial bus with differential data transfer. For the data transfer, two wires in the cable are needed. In addition, CAN bus cables can also contain two wires for 24V-power supply for the control modules. The CAN bus is daisy-chained from module to module, a 4-pin XLR plug is used as connector.
![[Important]](../pics/important.gif)
|
Important |
|---|---|
|
The CAN bus within a RM4200D may havea maximum length of 60 meters. Also consider that within the DSP frame, the CAN bus has a legnth of one meter already! If you do not consider these limitations, the communication of the modules within the RM4200D can be severely disturbed. Also, the data lines of the CAN bus must be terminated at both ends to avoid signal reflections. For termination, use a resistor of 90-120 Ohm between the data lines of the CAN bus. Within the DSP frame, the CAN bus is terminated automatically if you use a cable wih XLR connector. If the DSP frame is connected to an external power supply unit via a RJ45 port, you have to terminate the bus at the DSP frame using a XLR connector that contains the resistor between the data lines. |
|
As cables for the CAN bus, two BELDEN products can be used:
-
The cable BELDEN 3087A is used for cable lengths of under 10 meters.
-
The cableBELDEN 3086A is used for cable lengths of more than 10 meters. This cable has thicker wires for the power lines to ensure less voltage loss at longer distances.
![[Tip]](../pics/tip.gif)
|
Tip |
|---|---|
|
In contrast to other cable systems (e.g. Ethernet), there is no “standardized” CAN bus cable. DHD has measured the cable types named above and specified them for the RM4200D. You can order these cables in different lengths and with different connectors (XLR and Sub-D) at your DHD vendor. In part 1 of this manual, System Overview, you find a parts list with all available cables. |
|

![[Note]](../pics/note.gif)
|
Note |
|---|---|
|
Each RM4200D has one CAN bus only. This way, it is not possible to operate more than one DSP frame at the same CAN bus. If you want to operate several RM4200D together, you have to youple them via a network connection. |
|
If control modules are offset too far from the DSP frame, an additional power supply unit must be used to supply 24V voltage to the control modules. In this case, DSP frame and power supply carrier are connected via a thin cable which does not have any wires for power. The cable is connected via a RJ45 connector. Also here make sure the overall length of the CAN bus does not exceed 60 meters!

Make sure all control modules receive sufficient supply voltage. In larger systems, the supply voltage may be too low at the end of the CAN bus.
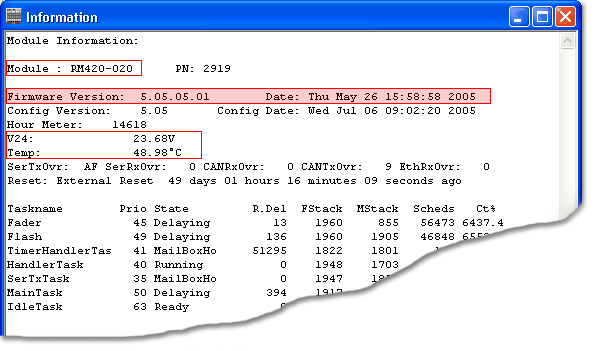
You can check this easily by opening the Maintenance window of the Toolbox4 software and read out the information for the last module in the chain. Values between 21 V and 24V are acceptable. If the voltage is lower, you should add an additional power unit. On this occassion, please ask your DHD vendor.
|
|
Important |
|---|---|
|
Make sure to ground the control modules properly using the screw threads on the back of the control modules. If there is no proper ground connection, on certain occasions problems with electrostatic discharges may occur! |
|
Electrostatic discharges in the control modules can lead to malfunctions if the modules concerned are not grounded properly. The reason for this is the following:
The control modules are connected to the DSP frame only via the CAN bus cable. If the modules are not grounded properly, the cable is the only connection to the RM4200D ground. Now, if an electrostatic discharge meets the control module, in certain conditions, the charge carriers can not be discharged properly, thus leading to a “Lock-Up” of the module. This effect causes that the module does not react to any operations any more. You have to interrupt the power supply of the module, this way forcing a restart.